Excel Guide to Keyboard Wedge Input and Data Manipulation
MicroRidge Guide on Keyboard Wedge Output into Excel
How do I get my gage data into Excel?
One of the key features in each of the MicroRidge Product Families is the ability to send gage data via a keyboard wedge output. The keyboard wedge output allows an operator (person taking measurements) to send gage data to any software including web/cloud-based programs, Microsoft Excel, and any internal/proprietary software at your manufacturing site.
MicroRidge offers native keyboard wedge output on the MobileCollect Wedge Base, GageWay KW, GageWay Pro Series, WedgeLink SP, and WedgeLink AT. For devices that only have a serial output (USB or DB9), we offer multiple Software Keyboard Wedges to “Translate” the data to keyboard strokes.
What is a keyboard wedge?
A keyboard wedge is a piece of hardware or software that translates native RS-232 serial or digital gage outputs into keystrokes that are interpreted by the computer as keyboard characters. The computer processes the MicroRidge keyboard wedge output as if it were coming from a regular keyboard. The hardware wedge output conforms to the USB Human Interface Device (HID) specification. Since applications and programs are designed to be manipulated by your mouse and keyboard, MicroRidge keyboard wedge output can enter data into any software.
Types of Keyboard Wedges
MicroRidge offers both hardware and software keyboard wedges. Hardware wedges are quick and easy; they’re best suited for simple operations. Many of MicroRidge’s hardware wedges can be customized with our setup programs. Customization of multiple units can be done on a document owner’s (person in charge of data) computer and then deployed to the work cells. They do not require any software to be installed onto the operator’s computer and allow for true “plug-and-play” installations.
Software wedges accomplish the same outcome but are applications installed on an operator’s computer. They read incoming serial port data (either physical [DB9] or virtual [USB]) and output the keystroke data. Set up requires the installation of the wedge software and any drivers required to utilize a virtual ComPort. The main benefits of utilizing a software wedge is the incorporation of features such as adding date/time stamps and parsing. Data parsing allows a document owner to set up conditional rules and parameters to modify the incoming data stream before being processed through the wedge. This lets a document owner remove unnecessary data, reorder values, perform basic calculations, and change the End of Packet (EOP) character.
MicroRidge Products with Built-In Hardware Keyboard Wedge
MobileCollect
Wireless product family targeted towards compatibility and flexibility. A 3 part system designed to retain the mobility of hand gages while automating data transfer. MobileCollect eliminates the error prone process of manually entering data with an industry tested, robust, and secure local wireless protocol. A simple add-on to handheld gages with an SPC port. Great for automating your data collection directly in process where the operator measure the workpiece in-situ.
MobileCollect Keyboard Wedge Devices
- MobileCollect Wedge Base Receiver: MC-BASE-KW (Programmable)
GageWay
Wired interfaces with the ability to interface with 1-72 gages. Advanced onboard features such as auto baud rate detection, data packet parsing/modification, custom remote switching, and multiple data read formats, including TIR. Great for automating your data collection at dedicated QA or inspection stations where the work piece is brought to the station for inspection.
GageWay Keyboard Wedge Devices
- GageWay KW: GW-KW (Non-Programmable)
- GageWay Pro Series: GW-PRO2, GW-PRO4, GW-PRO8 (Programmable)
WedgeLink
Software and Hardware Keyboard Wedges with Parsing capabilities and ability to send RS-232 data to any program.
WedgeLink Keyboard Wedge Devices
- WedgeLink SP: WLNK-SP (Non-Programmable)
- WedgeLink AT: WLNK-AT (Programmable)
WedgeLink Keyboard Wedge Software Applications
Limitations of a Keyboard Wedge
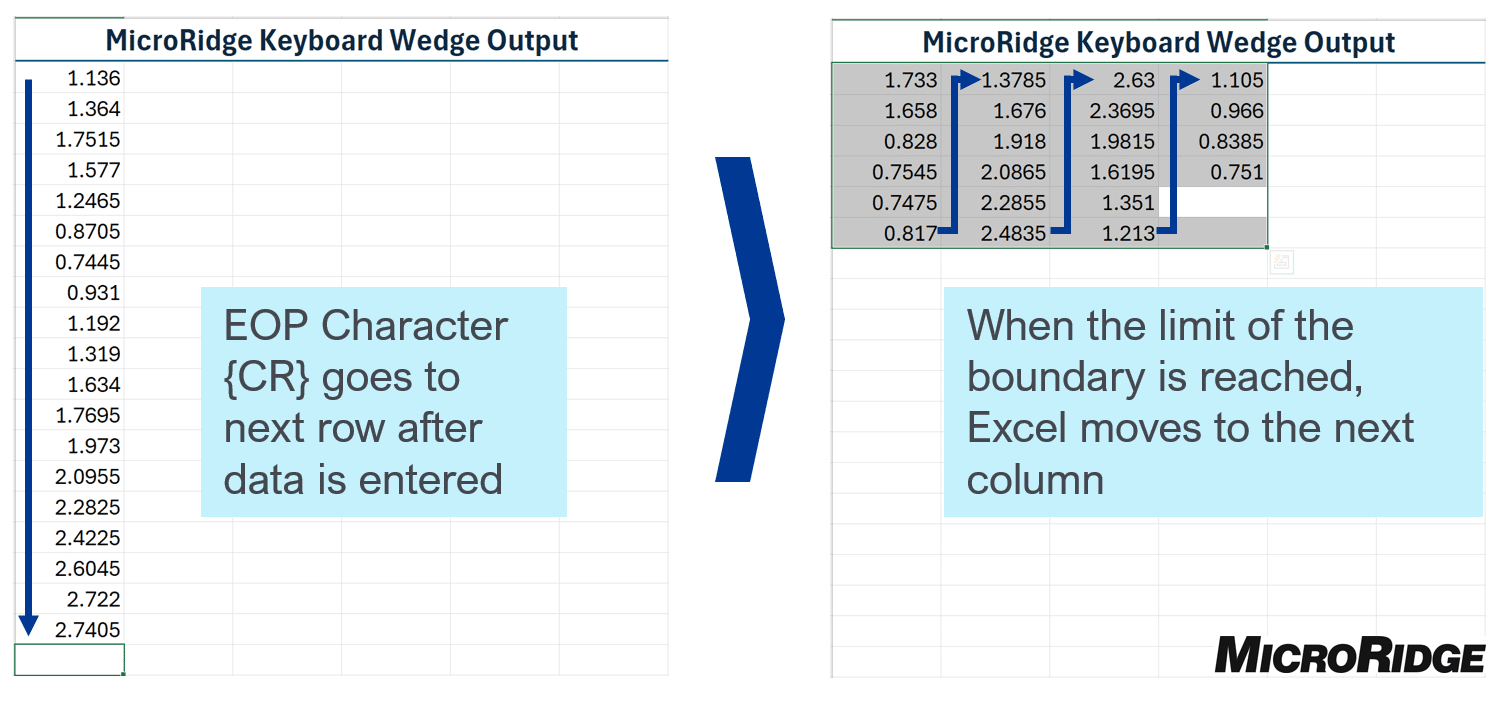
Most applications require 2 forms of HID input to manipulate: mouse and keyboard. The mouse is used to navigate menus and select/activate fields in the program for the keyboard to enter data into. Since the keyboard wedge is emulating a keyboard, an operator needs to navigate within the program via the mouse. For example, in Excel an operator would select the desired cell where the data would be entered. The standard End of Packet (EOP) Character for MicroRidge Devices is a Carriage Return {CR}. Carriage Returns are an artifact of typewriters and modern keyboard wedges treat a {CR} the same as the “Return” or “Enter” key on a keyboard, advancing to the next cell down.
In a typical manufacturing setting, data is not as useful in a single column and a document owner may want to modify how the data gets entered in their custom spreadsheet. A company may want to add other data such as Time, Part Number, QA station, etc. These additions add complexity to the spreadsheet.
Since every spreadsheet is different, the key to maximizing the keyboard wedge’s potential is to customize your spreadsheet. This document gives some basic tips and tricks a document owner can employ to create a more user-friendly spreadsheet when paired with a keyboard wedge.
This is not a comprehensive guide and only covers basic Excel functions to help get an Statistical Process Control (SPC) program started. If your needs go beyond this guide, consider direct VBA coding of your spreadsheet or upgrading to a purpose built SPC program. MicroRidge works well with any SPC program, and we have some great recommendations on our SPC Partners Page.
Section 1: Customizing Data Entry Direction
Download Excel Template to Follow Along
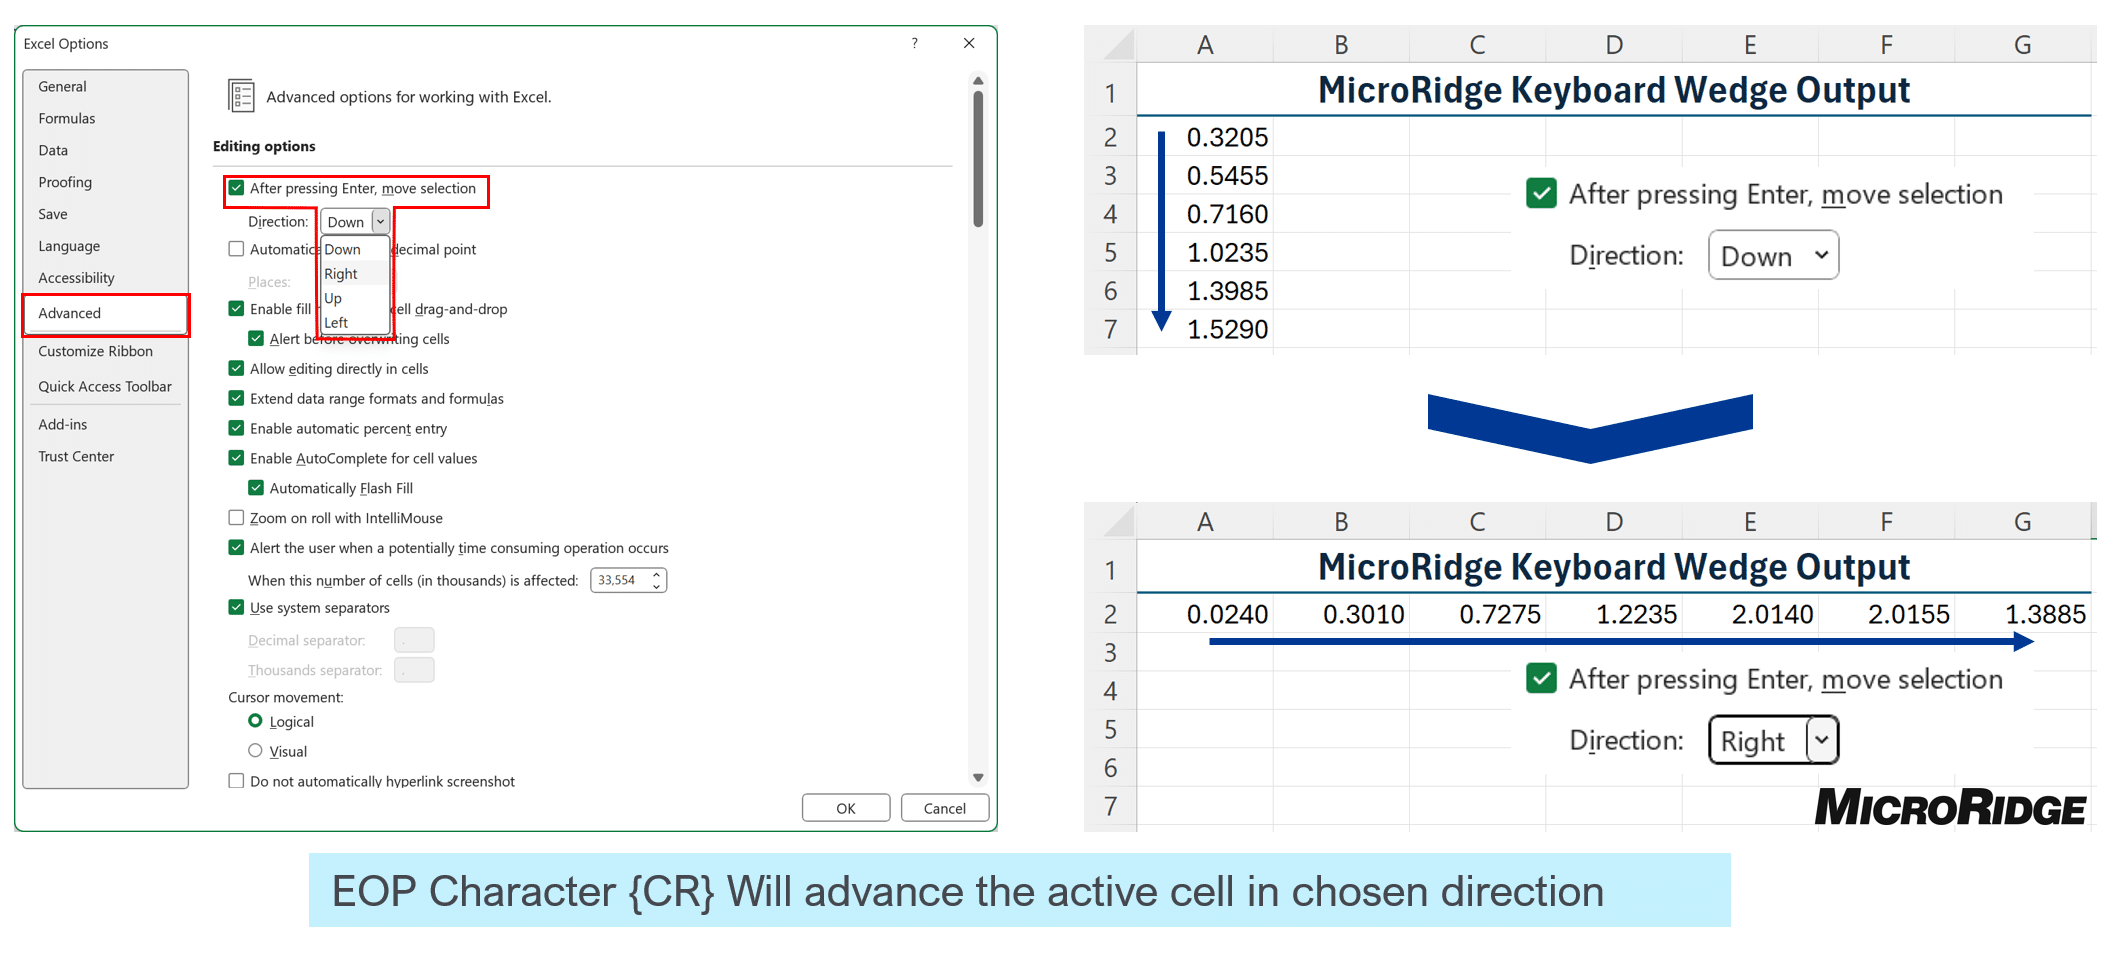
The most basic customization a document owner can do is to change the direction of data entry in Excel. MicroRidge devices have a default End of Packet Character (EOP), a Carriage Return {CR}. When Excel receives a {CR}, it’s treated as if the enter key on the keyboard was pressed. The cursor will move down 1 row and that cell will be ready for the next data packet.
1a: Changing Excel Advanced Setting for {CR} “Enter” Direction
In the File>Options menu, navigate to “Advanced”. The first option allows the document owner to change the direction of cursor advancement after the “Enter” key is pressed. By configuring Excel’s reaction to the “Enter” key, you are also affecting how it reacts to the EOP {CR}. After the selection is made, click “OK” to save the new configuration.
Please Note: This will change how Excel reacts to pressing the “Enter” Key on your keyboard as well.
2a: Changing EOP Characters on MicroRidge Devices
If a universal change to Excel is undesirable, it’s also possible to change the EOP character from your MicroRidge Device. These changes only apply to MicroRidge devices and it will not effect how Excel behaves. The following devices support EOP configurability.
Hardware Devices with EOP Configurability
- MobileCollect Wedge Base Receiver: MC-BASE-KW
- GageWay Pro Series: GW-PRO2, GW-PRO4, GW-PRO8
- WedgeLink AT: WLNK-AT
Changing the EOP on the MobileCollect Wedge Base Receiver – MC-BASE-KW
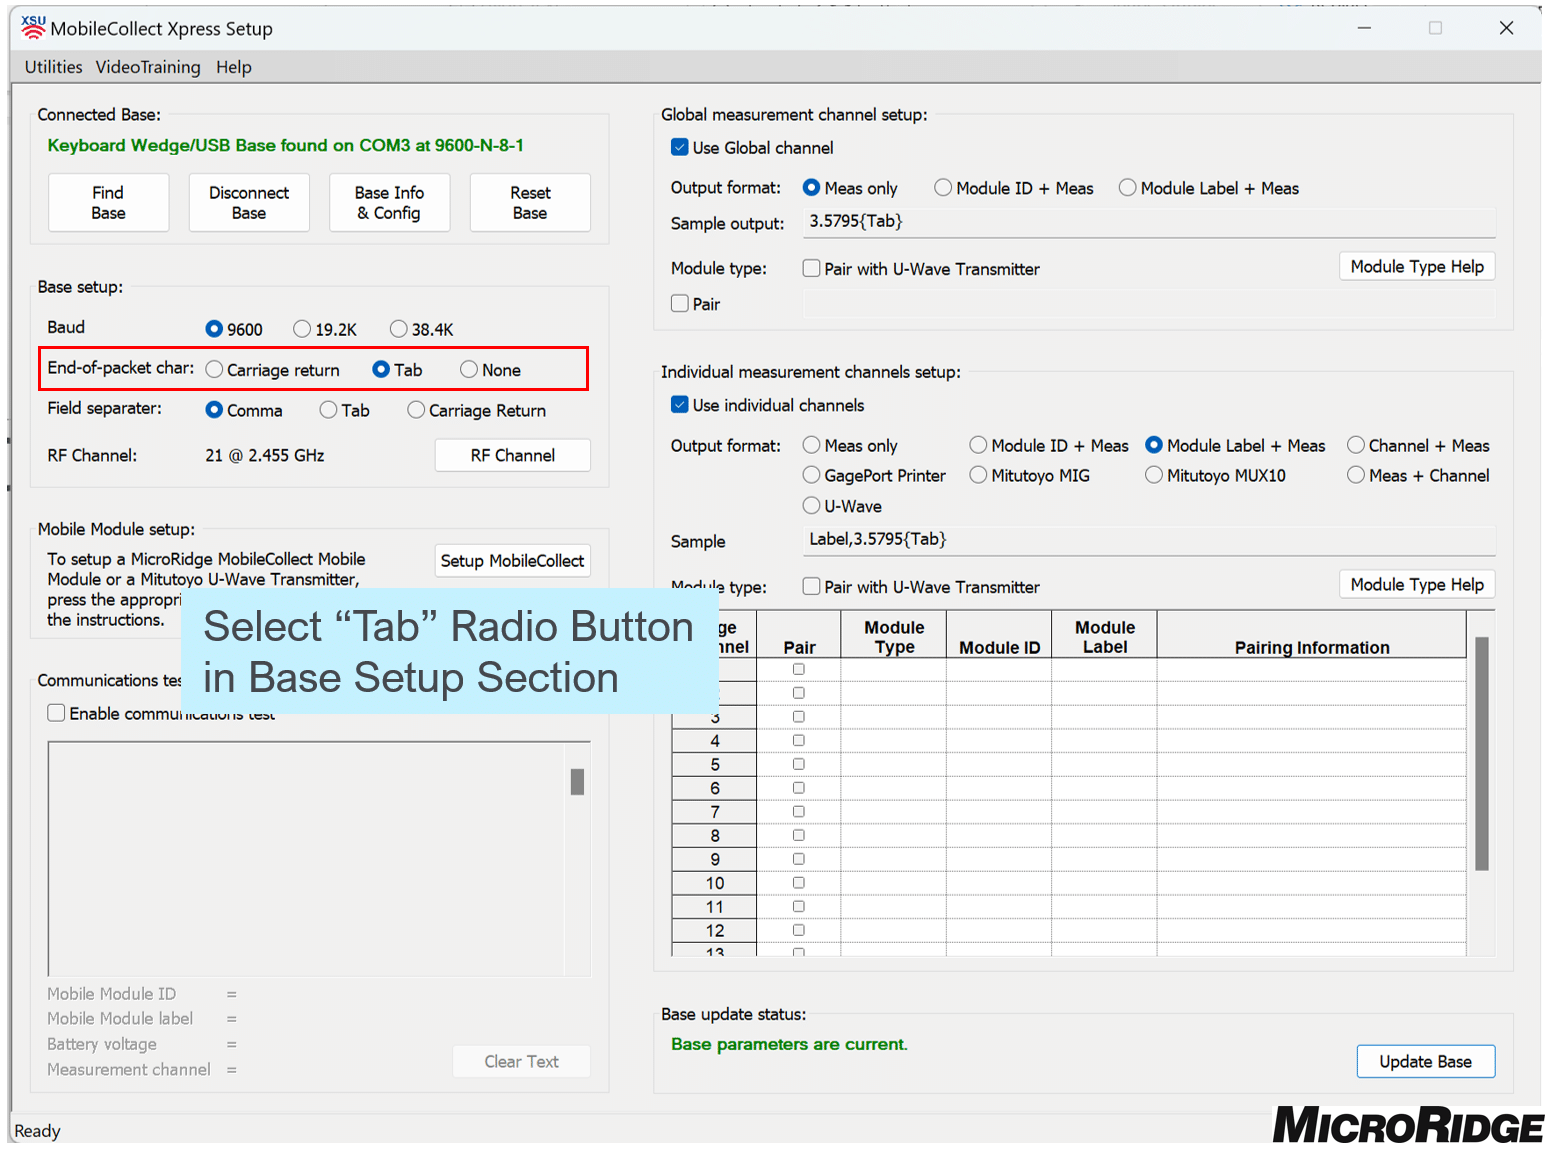
Xpress Setup
Xpress Setup is a quick and easy setup program, changing the EOP character to {Tab} is easy, but options are limited.
MobileCollect Extended Setup
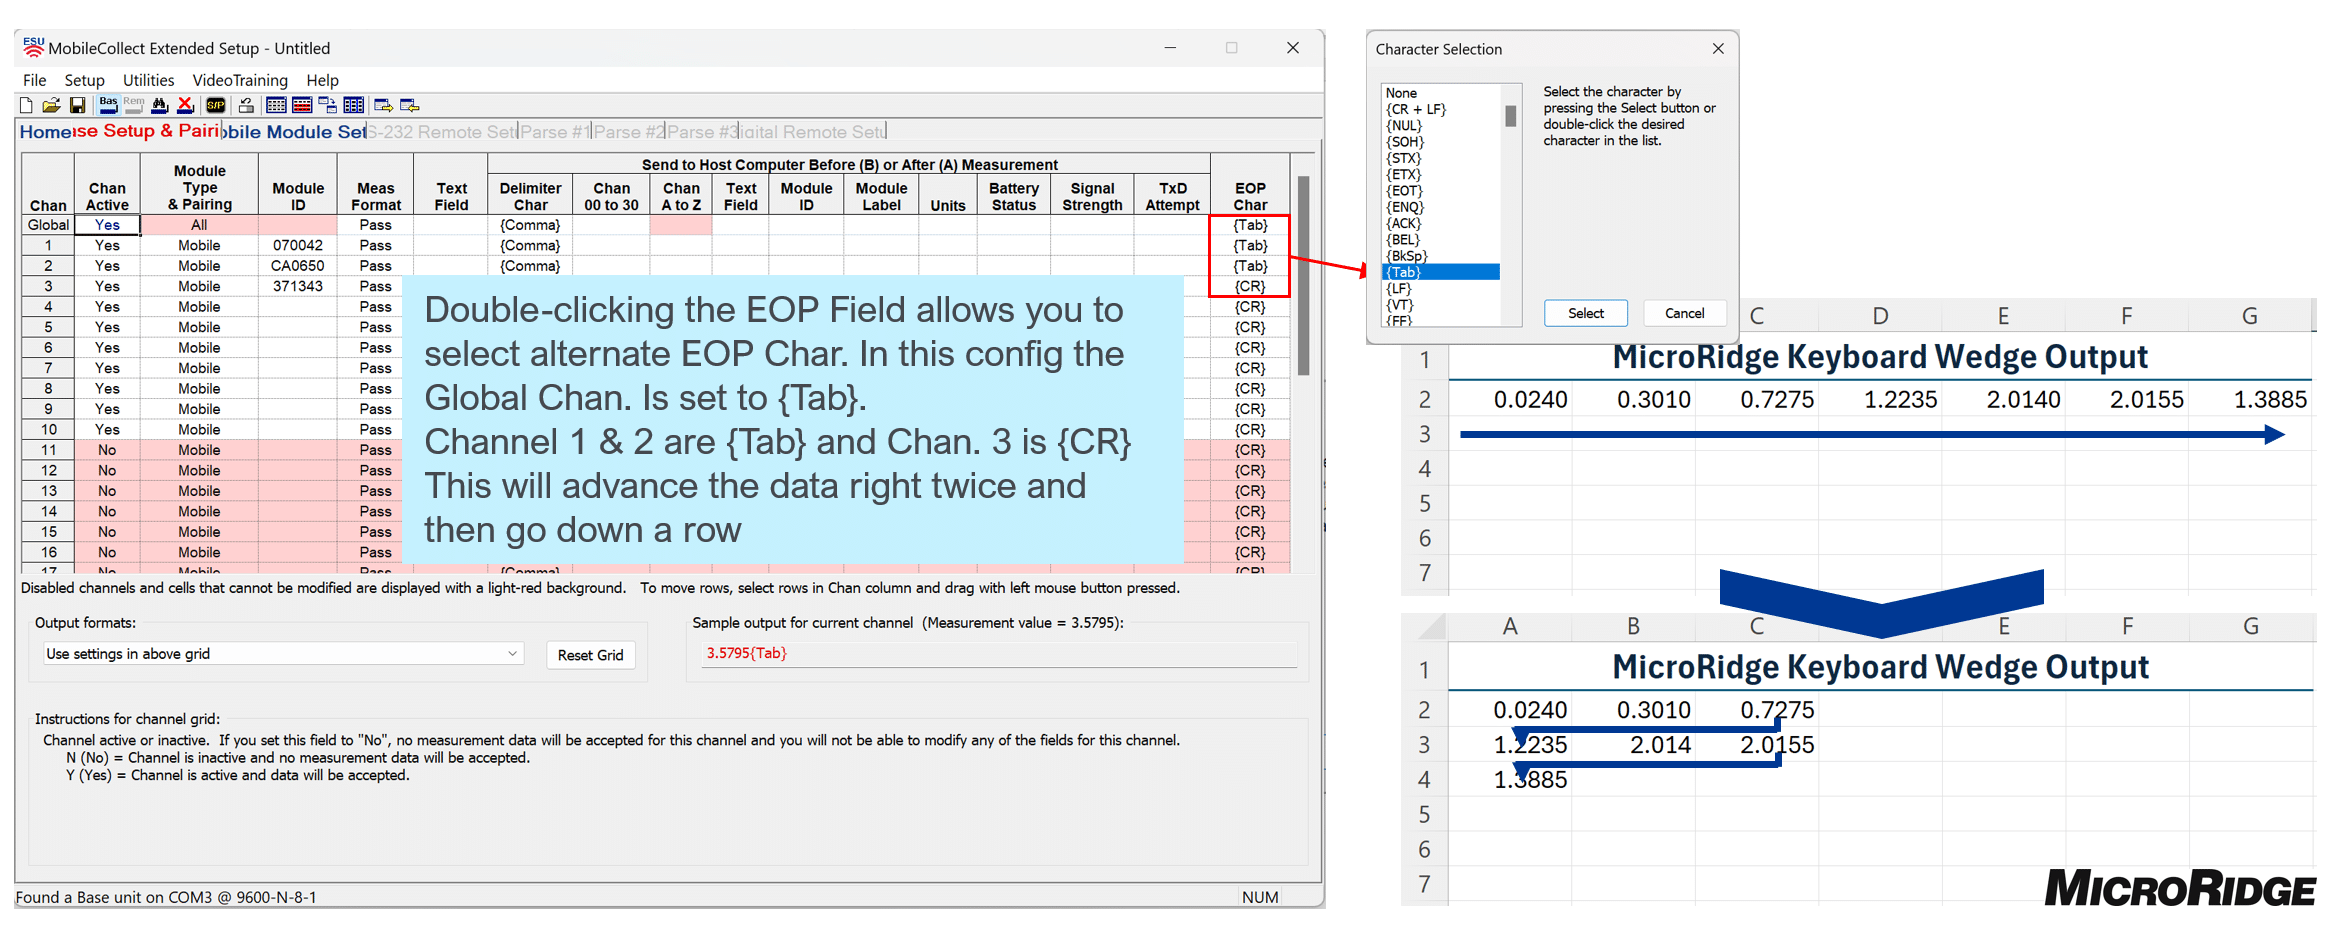
There are 2 possibilities with Extended Setup:
- Global and Specific Channel. EOP Characters can be set for both respectively. In Extended Setup you have the advantage of configuring each channel to a different EOP via the EOP Char field.
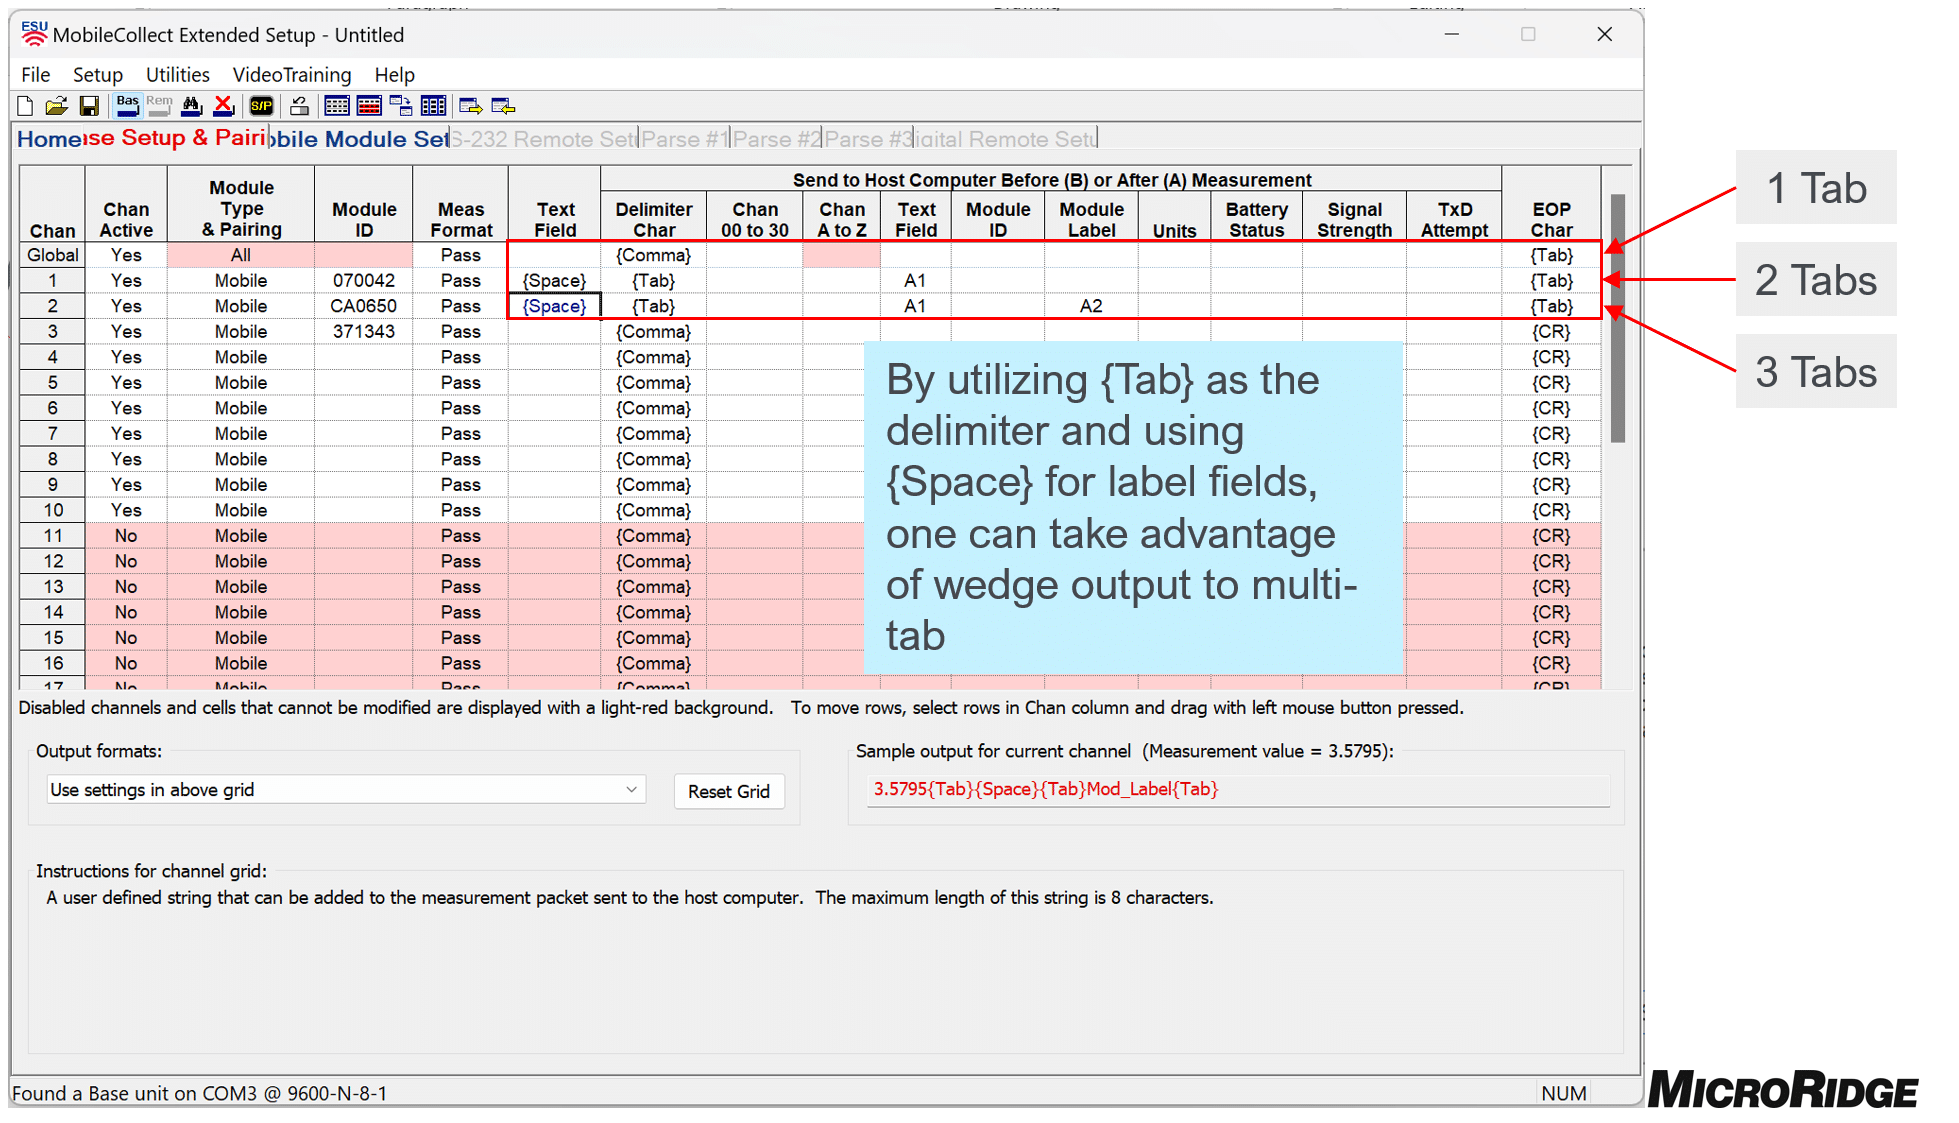
2. It is also possible to create a Multi-Tab configuration by employing other field labels as a {Space} and setting Delimiter to {Tab}. This would be advantageous if you wanted to skip a column on your spreadsheet.
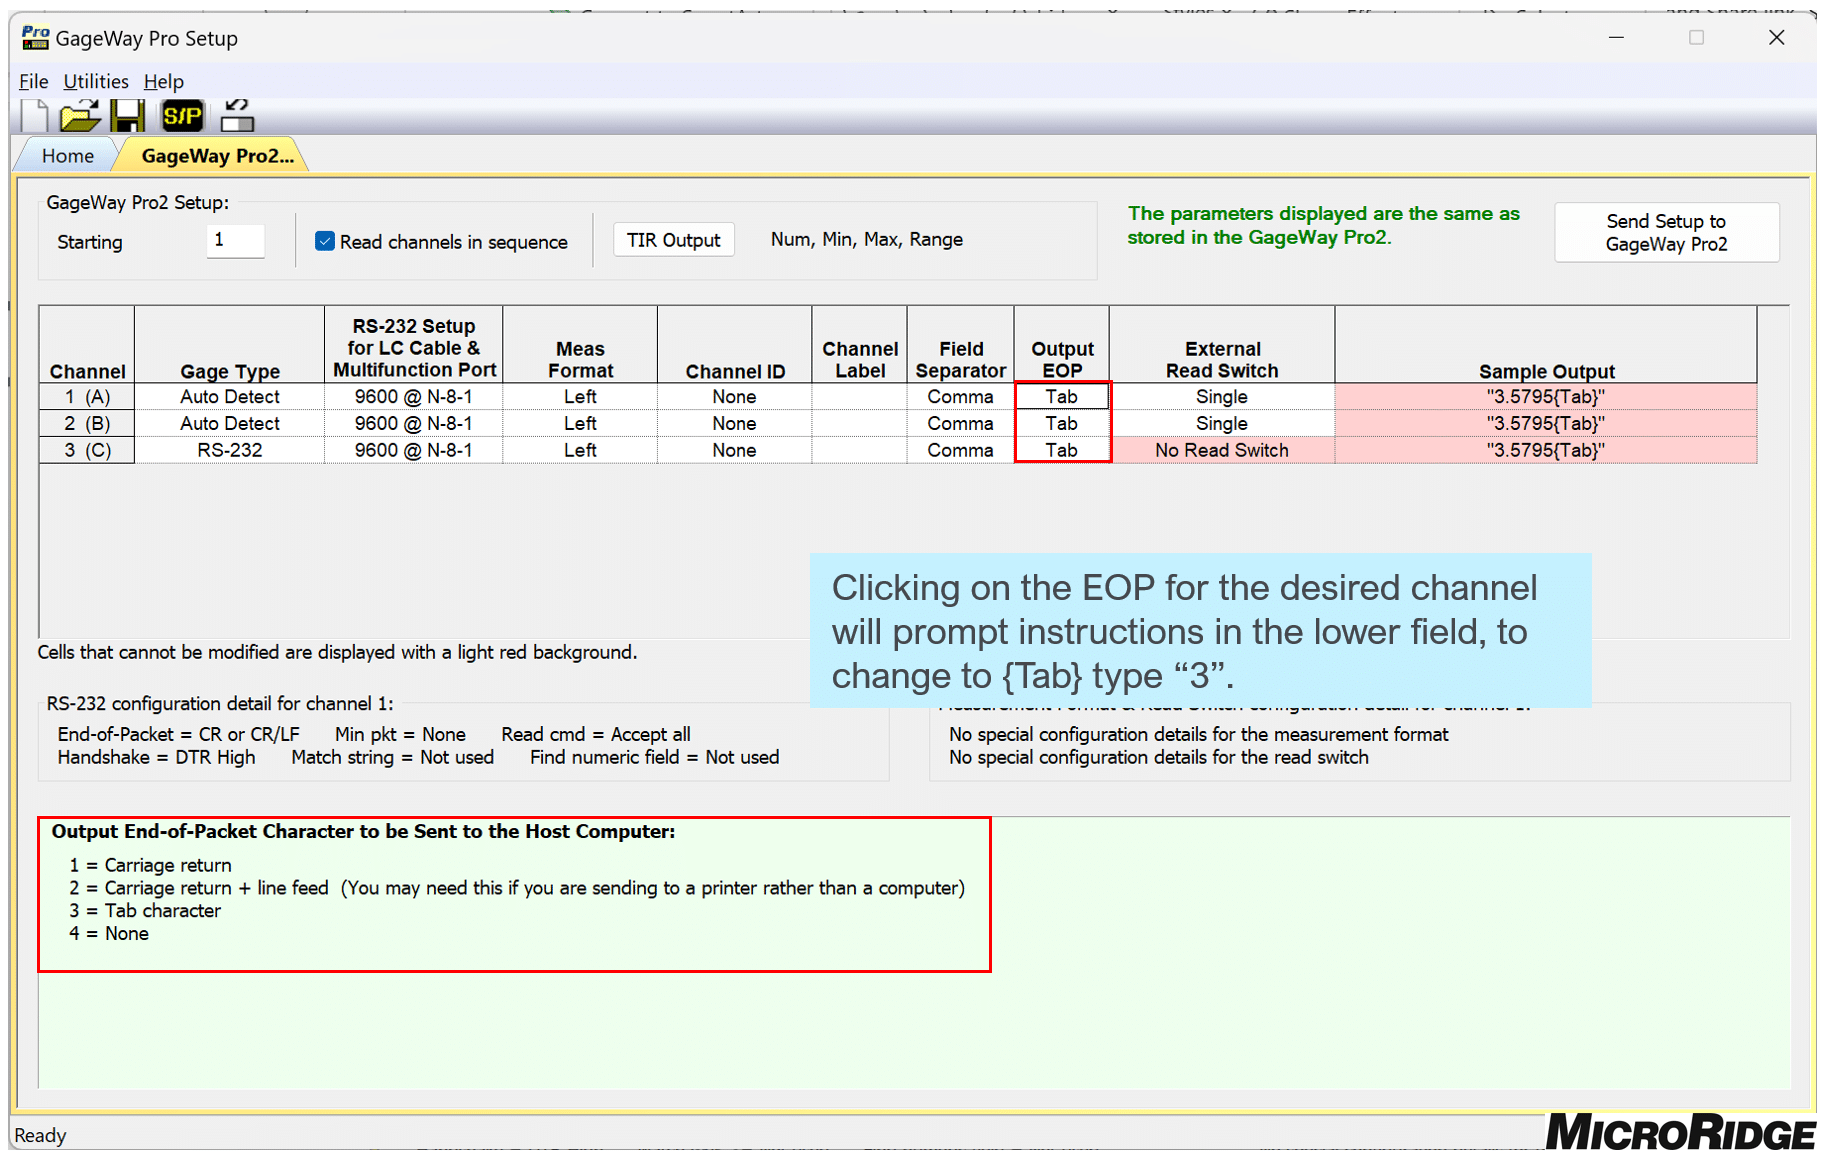
Changing the EOP on the Gage Pro Series – GW-PRO-2, GW-PRO-4, GW-PRO-8
GageWay Pro Setup
GageWay Pro Setup is channel specific and entered via typing in a “3” to change the EOP to {Tab}.
Changing the EOP on the WedgeLink AT – WLNK-AT
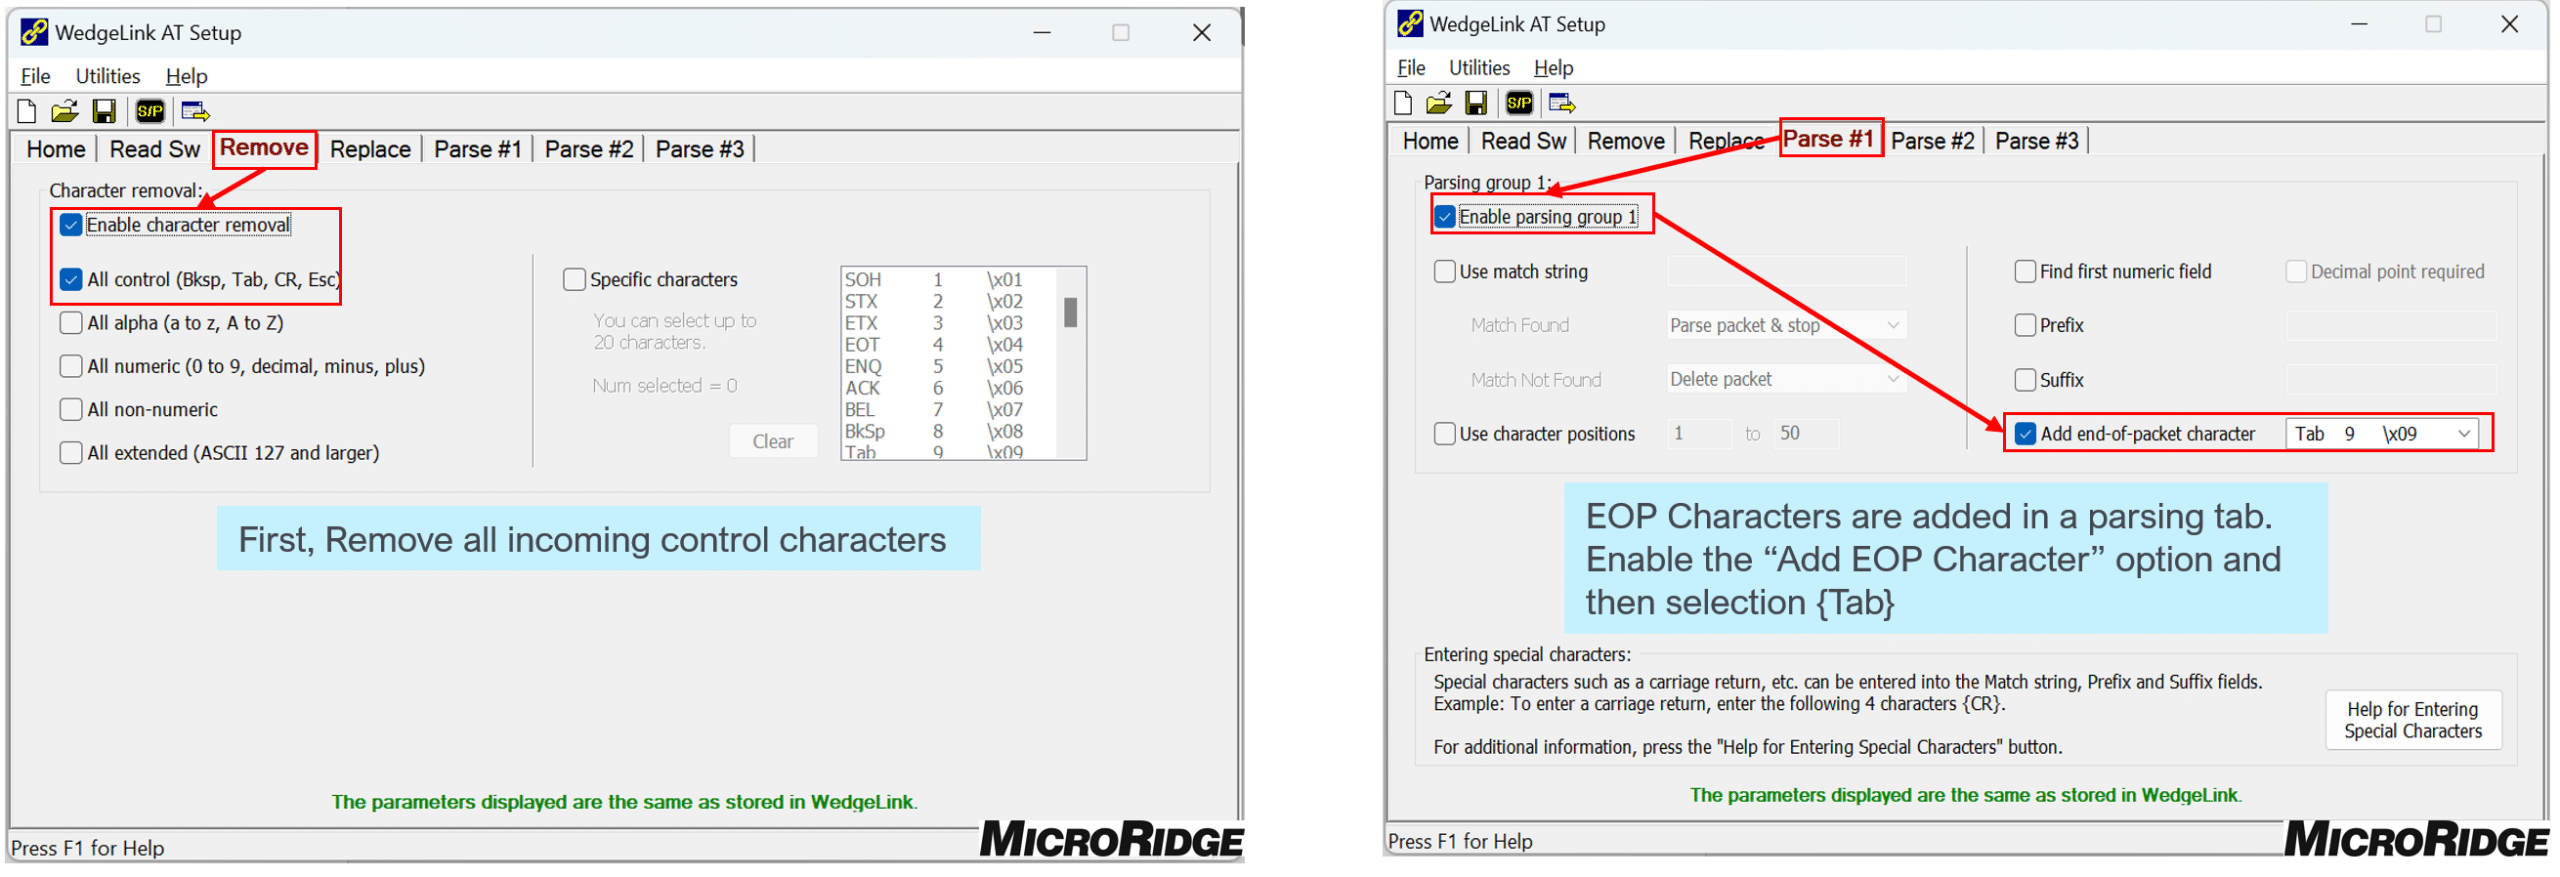
WedgeLink AT Setup
There are 2 possibilities with WedgeLink AT Setup:
- In WedgeLink AT Setup, the EOP is assigned as a parsing feature. First, you must remove all incoming EOP characters and then add the {Tab}.
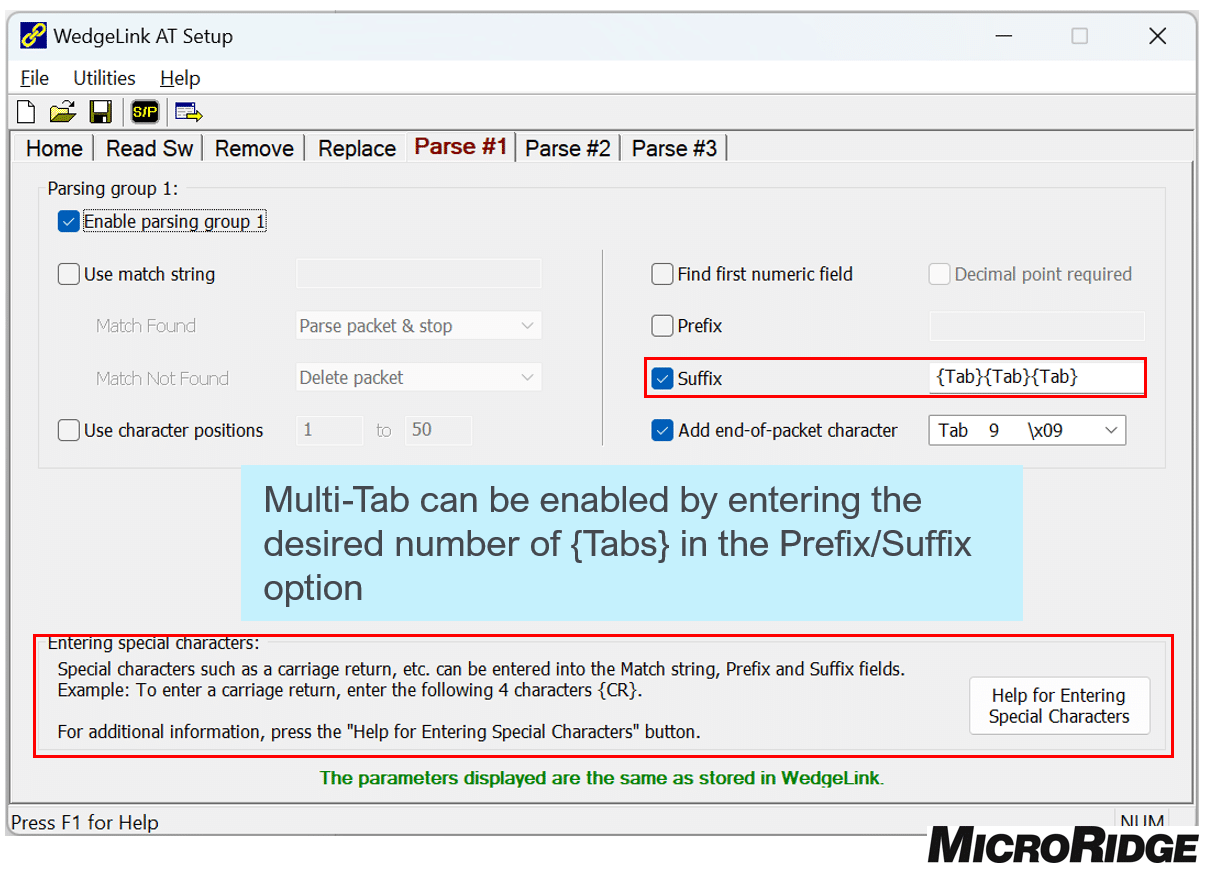
2. Multi-tab is available as an option in WedgeLink AT Setup.
Section 2: Limiting Data Entry to Selected Cells
Often, data being sent to Excel is used to populate customized spreadsheets that have additional data such as part number, feature name, date & time, etc. Since a Keyboard Wedge is acting like a keyboard, operators can overwrite unintended cells if they continue to press the “Read” button on the Transmitter. The following sections illustrate how to create different levels of cell entry restrictions to help guide the operator during data entry.
2a: Manual Data Entry Limits by Selecting Cells
The simplest method to controlling where data is entered is by selecting the desired cells by highlighting them with the cursor. The keyboard wedge output will enter data as normal until it reaches the boundary of the highlighted cells. When the boundary is reached, the data will progress to the next column if the EOP is {CR} or the next row, if the EOP is a {TAB}.
2b: Named Ranges
An alternative to manually selecting the boundary cells each time, is to utilize the ability to “Name Data Ranges” in Excel. A named range is typically used when creating custom formulas or scripts to enable a complex groupings of cells to be referenced with an easier to remember name. The benefit of naming a range is that when selected, Excel will limit the data entry to the named range.
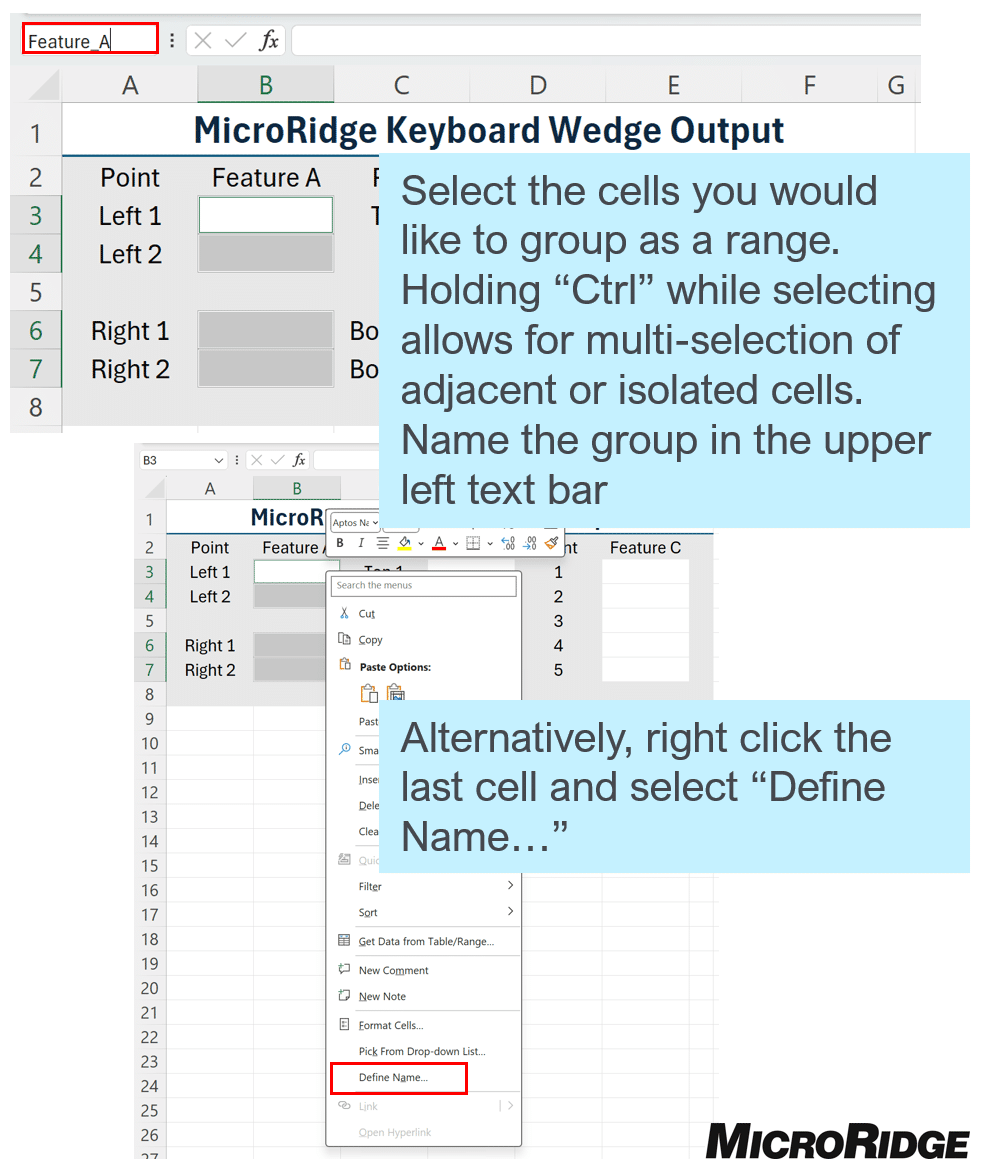
When “Ctrl Selecting” multiple non-adjacent cells, the final cell selected will be the first cell that is used to store data. Start your “Ctrl Selection” with the 2nd desired data cell and progress to the end of the desired data cells, then lastly, select the data cell intended to be first before naming the range.
When managing multiple Named Ranges, they can be viewed and edited in the “Name Manager” in the Formulas Tab.
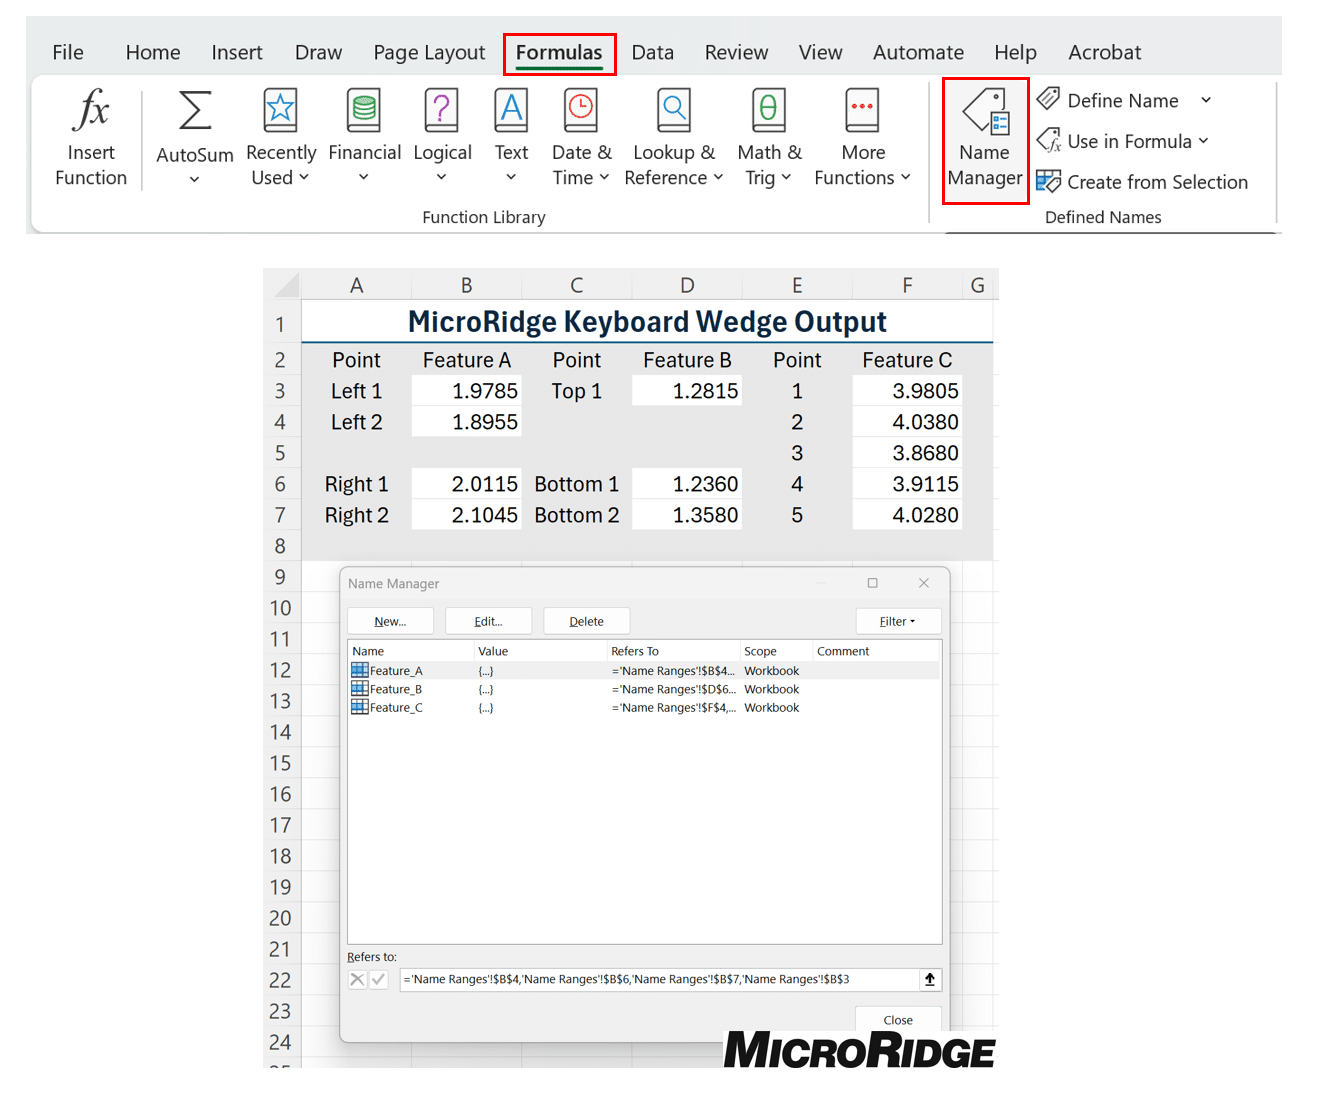
Once all Named Ranges are defined, select those pre-determined cells in the upper left-hand selector by clicking on the drop-down arrow. Data will cycle through the Named Range cells.

2c: Allow Edit Ranges
While Named Ranges allow a document owner to identify a group of cells for data to be entered, it still allows an operator to enter data elsewhere by selecting other cells.
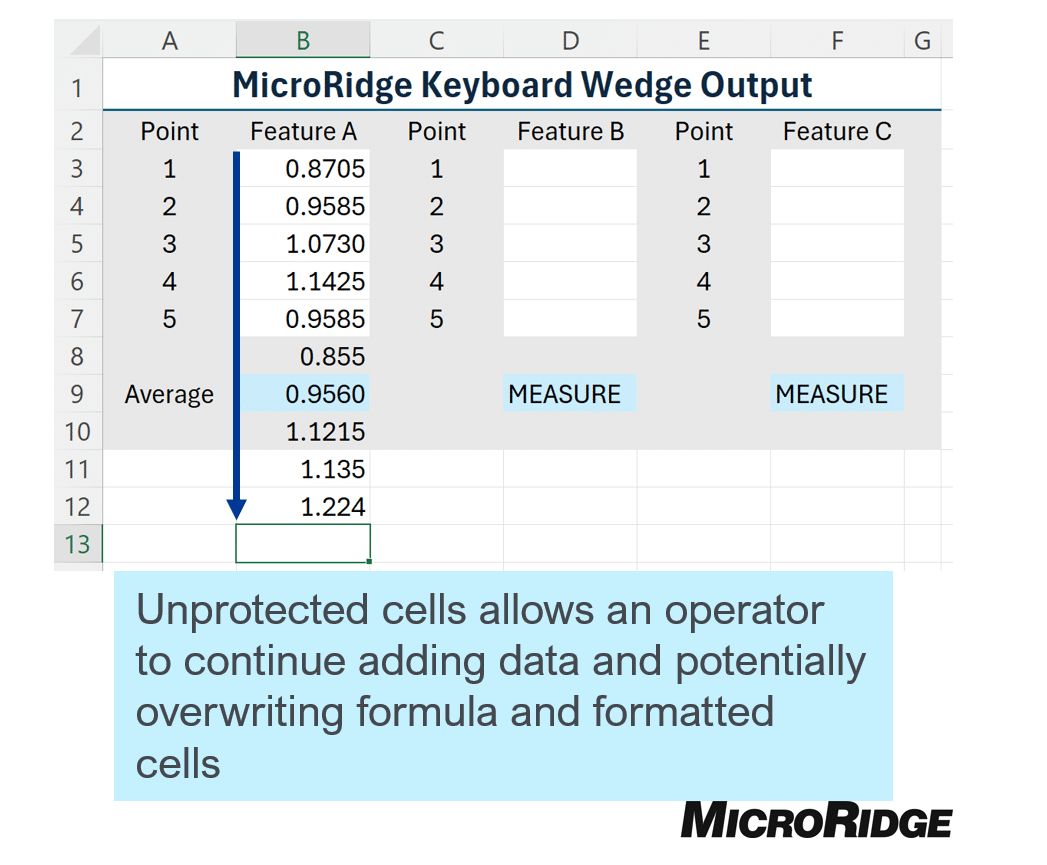
If this is undesirable, utilizing “Sheet Protection” and “Allow Edit Ranges” will give the document owner more control over the operator’s data entry. This can also help retain any formatting and calculation cells, while allowing an operator to view formulas for reference.
Start by defining which cell(s) are allowed for data entry with the “Allow Edit Ranges” tool.
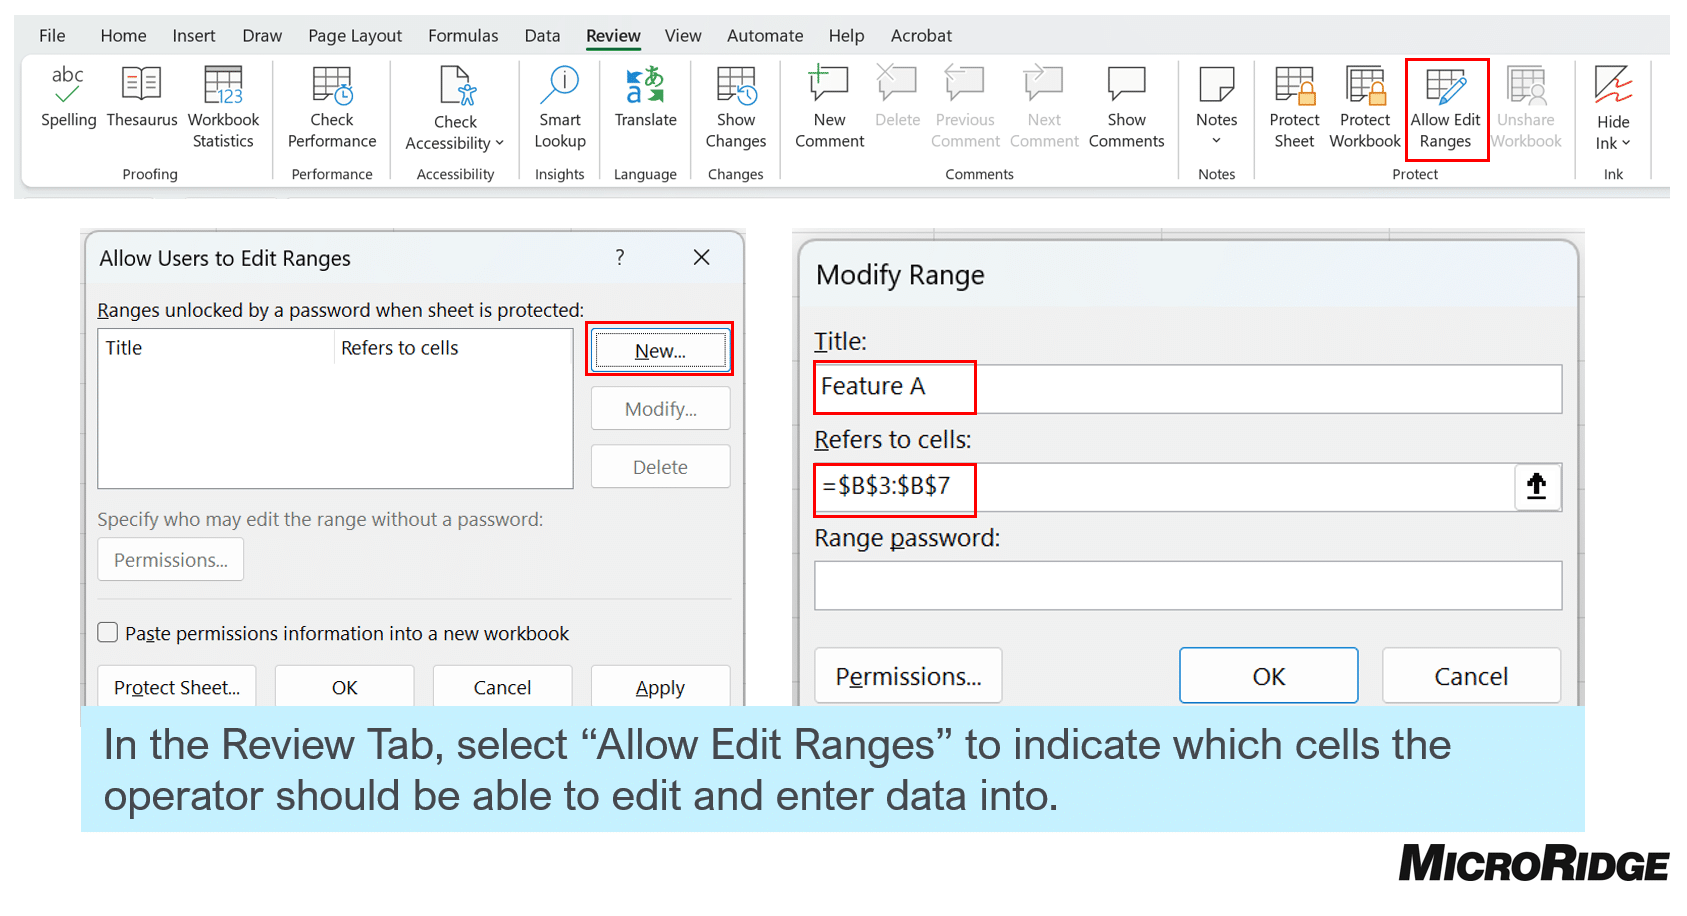
A document owner can also set specific permissions for each operator with the “Permission” option within the “Allow Edit Ranges” menu. The permissions access control system is based on the Windows User permissions system. Your local IT should be consulted before making changes.
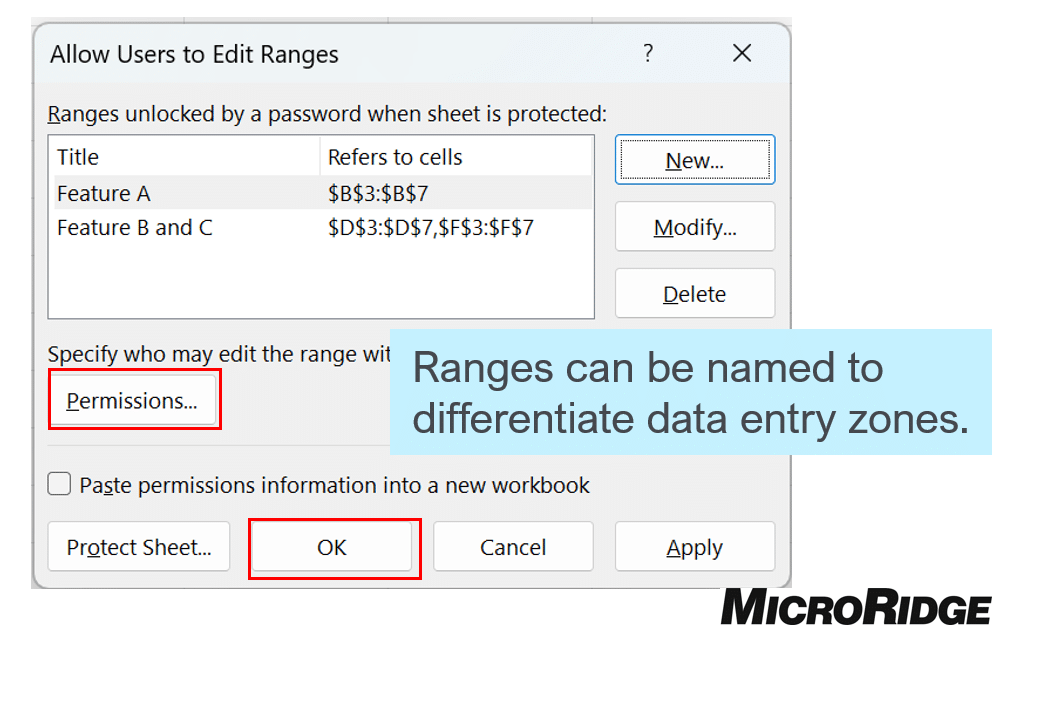
Once the data entry cells are identified, utilize the “Protect Sheet” tool in the “Review” tab to disable editing of all cells not identified previously with “Allow Edit Ranges”.
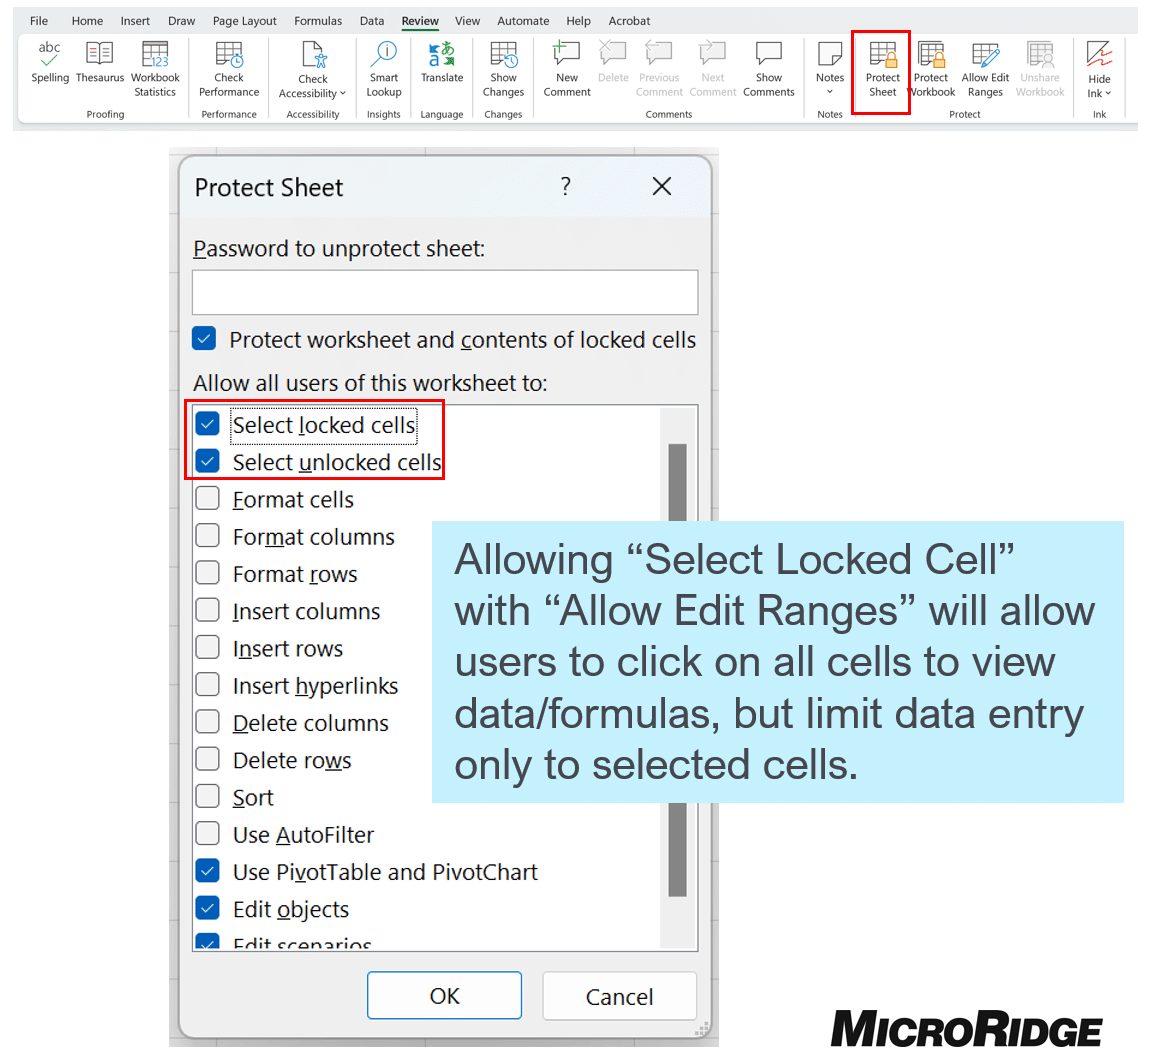
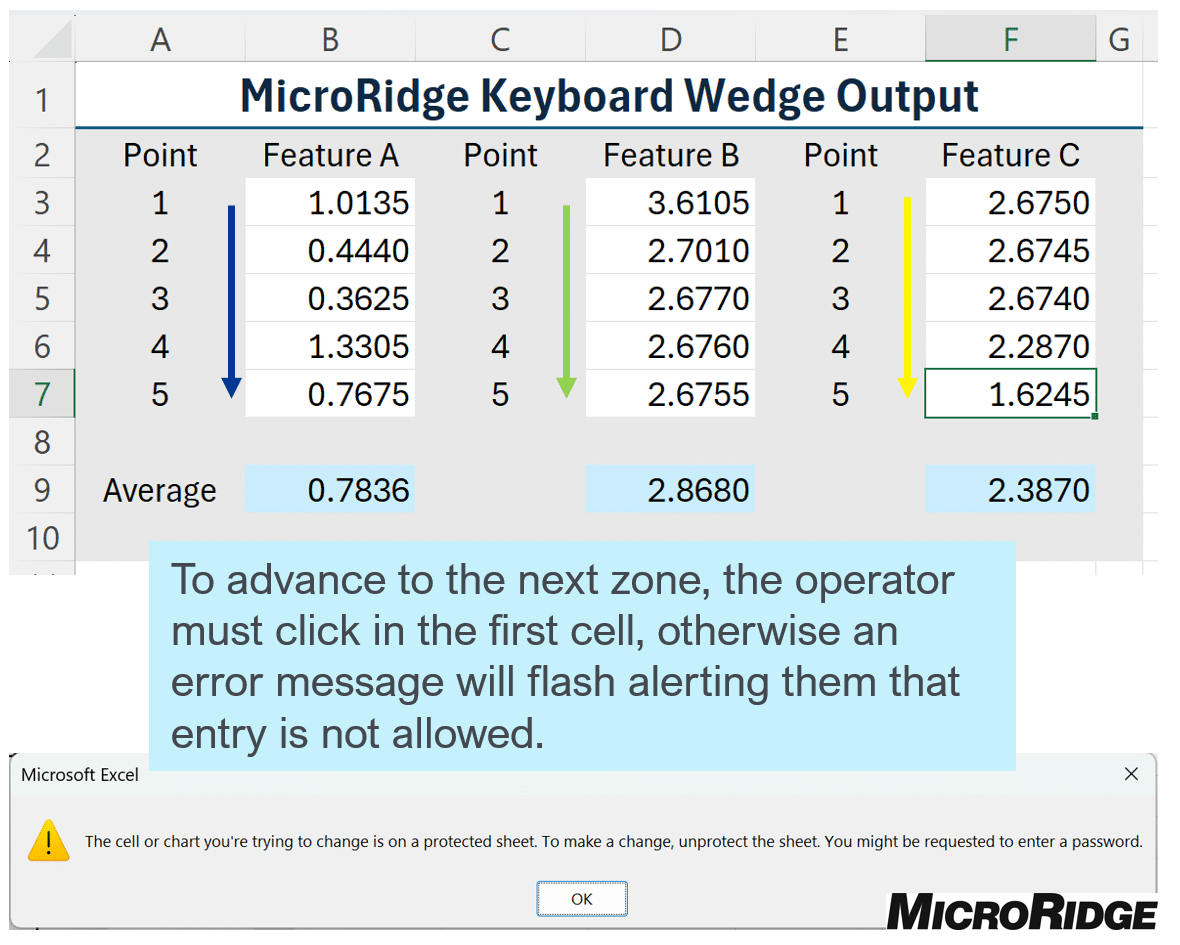
The outcome will allow an operator to click on any cell and view contents/formulas but limit any data entry to those cells identified with the “Allow Edit Ranges” tool. If an operator tries to enter data in a protected cell, they will get an error message stating that the cell cannot accept data. (Note: Pressing Enter or a {CR} EOP will quickly exit out of the error message)
2d: Protected Sheets
If more control is desired in the sheet, operators can be completely locked out from selecting cells other than the desired data entry cells. In this method, locked cell info cannot be viewed or selected.
Using a combination of cell settings and worksheet protection, a document owner can restrict which cells an operator can select.
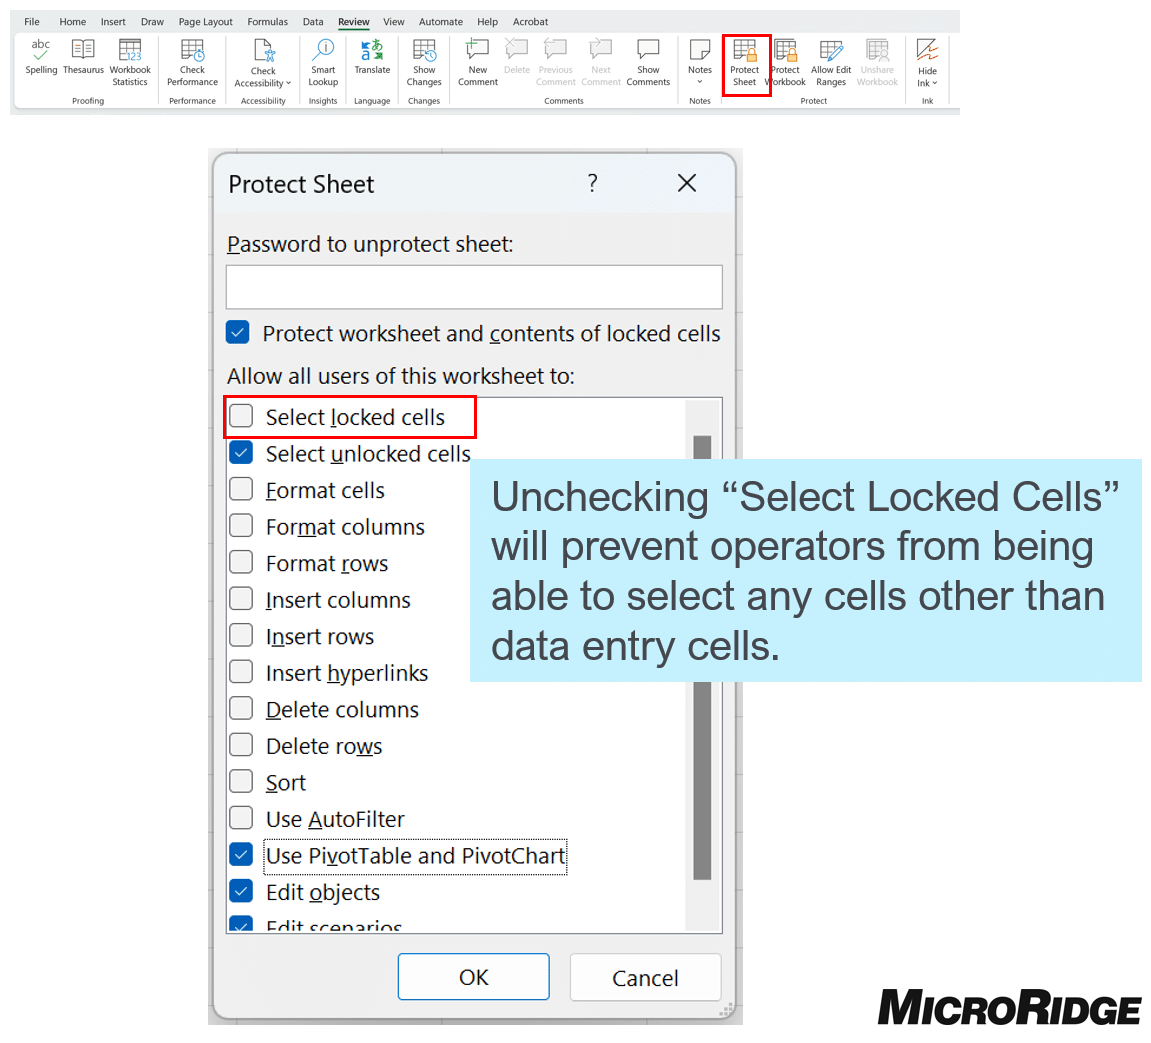
First, select cells desired for data entry, then right click and select “Format Cells.” and navigate to the “Protection” Tab. The default in Excel is for all cells to be “Locked” to allow users to enter data uncheck “Locked”. This will allow cells to be selected after protecting the work sheet.
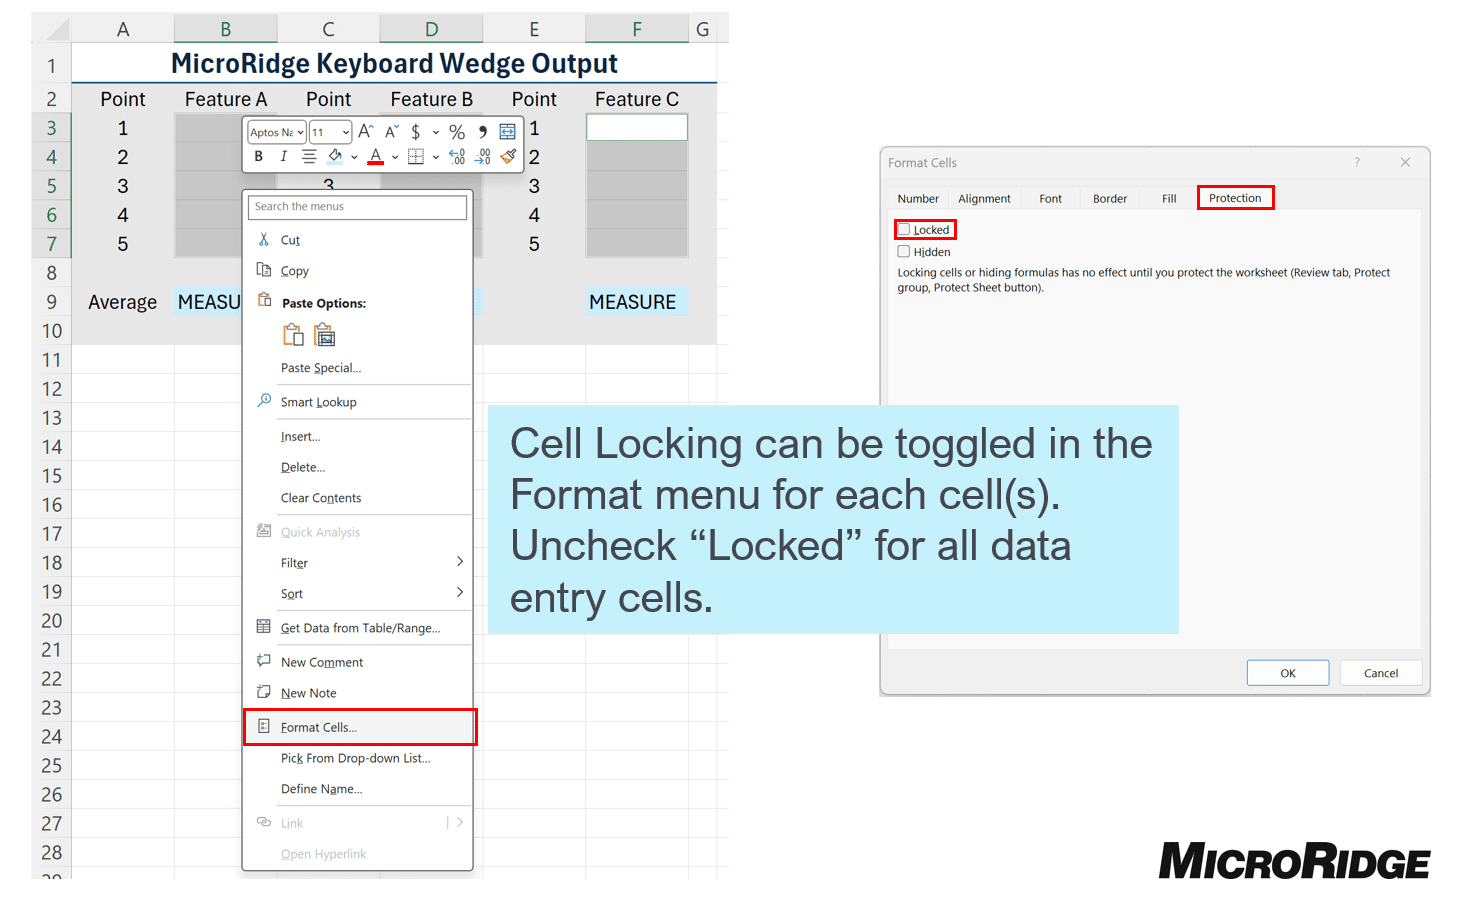
Once the desired cells have been unlocked activate “Protect Sheet”. When the “Protect Sheet” menu comes up, uncheck “Select locked cells” to allow operators to select the data entry cells that were previously unlocked.
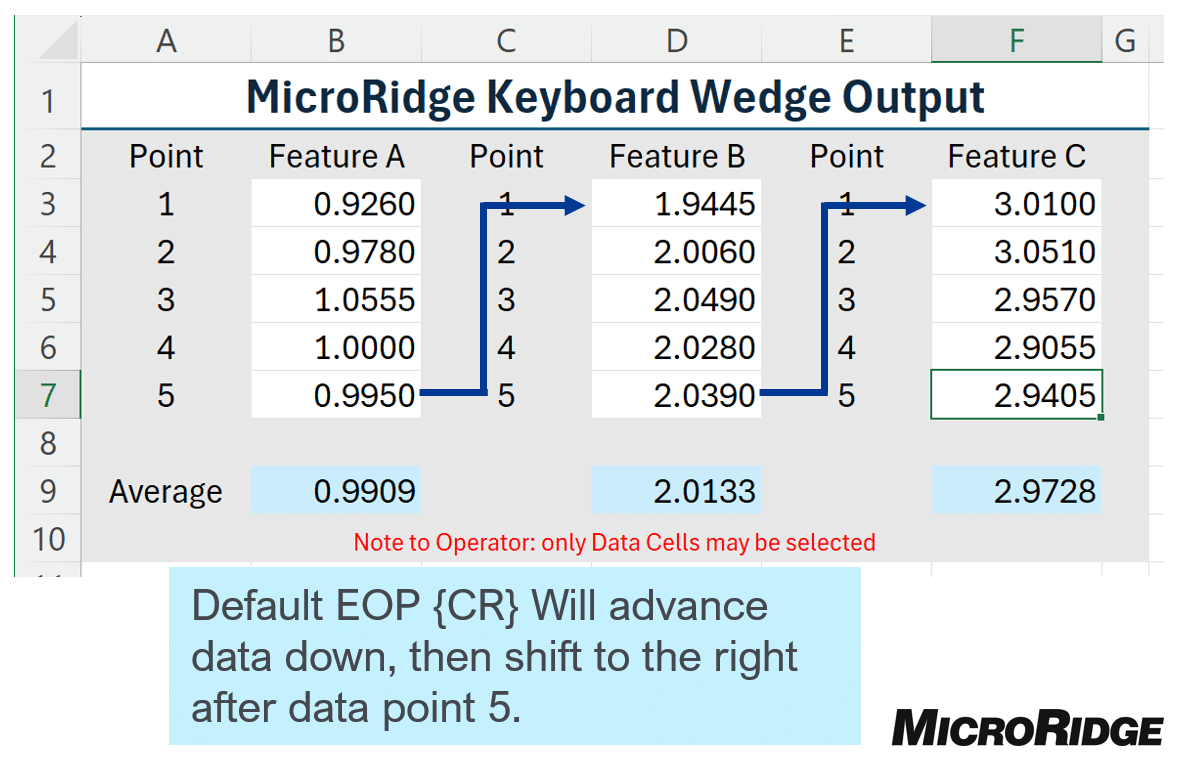
When an operator enters data, the unlocked cells will act like continuous cells and at the end of one group the EOP will advance to the next cell. Data can be entered in multiple zones without clicking on cell groups.
Section 3: Live Cell Formatting for Quick Data Validation
Because a Keyboard Wedge acts like a keyboard, there is no inherent verification of the quality of data being entered. With some conditional formatting and basic formulas, a document owner can program some quality checks within the spreadsheet to assist the operator.
3a: Data Validation
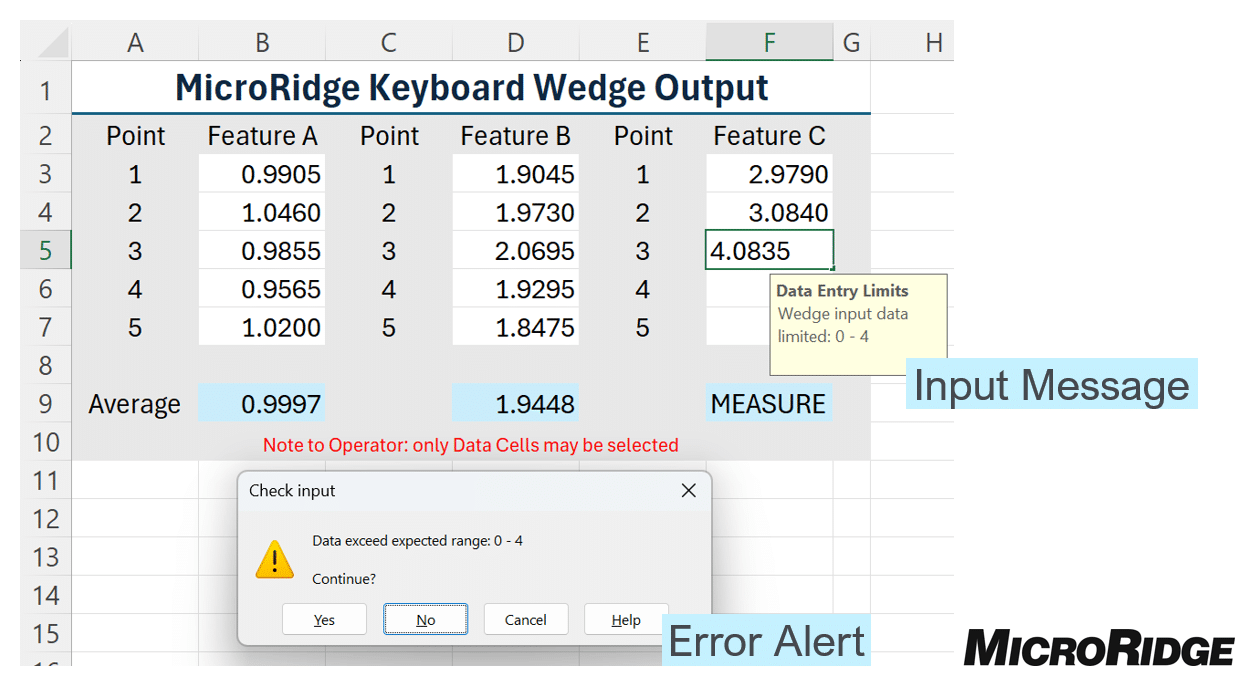
The “Data Validation” tool allows a document owner to warn or stop an operator if the entered data does not match the expected range of values. Typical measurement data is a decimal number with an expected range of values. The document owner can program “Data Validation” (in the Data Tab) to flag entry data based on some basic logic and limits.
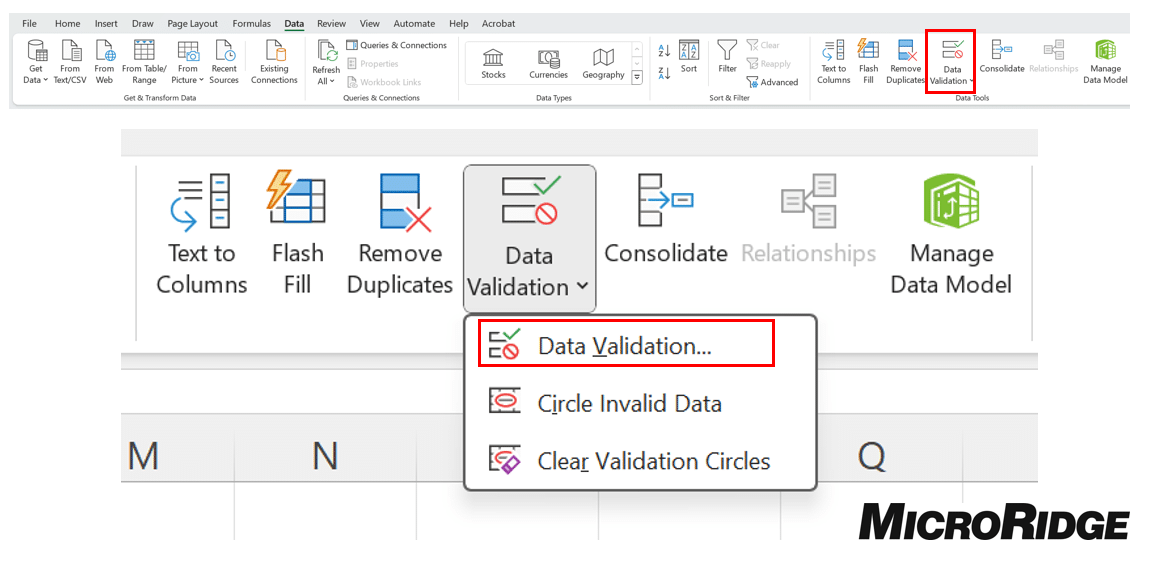
In the example below, non-numeric and numeric data outside of 0.000 – 4.000 will be flagged for review by the operator. Error alerts can range from information to halting the process. In the example below, the operator is promoted with a warning box to verify if the data should be accepted.
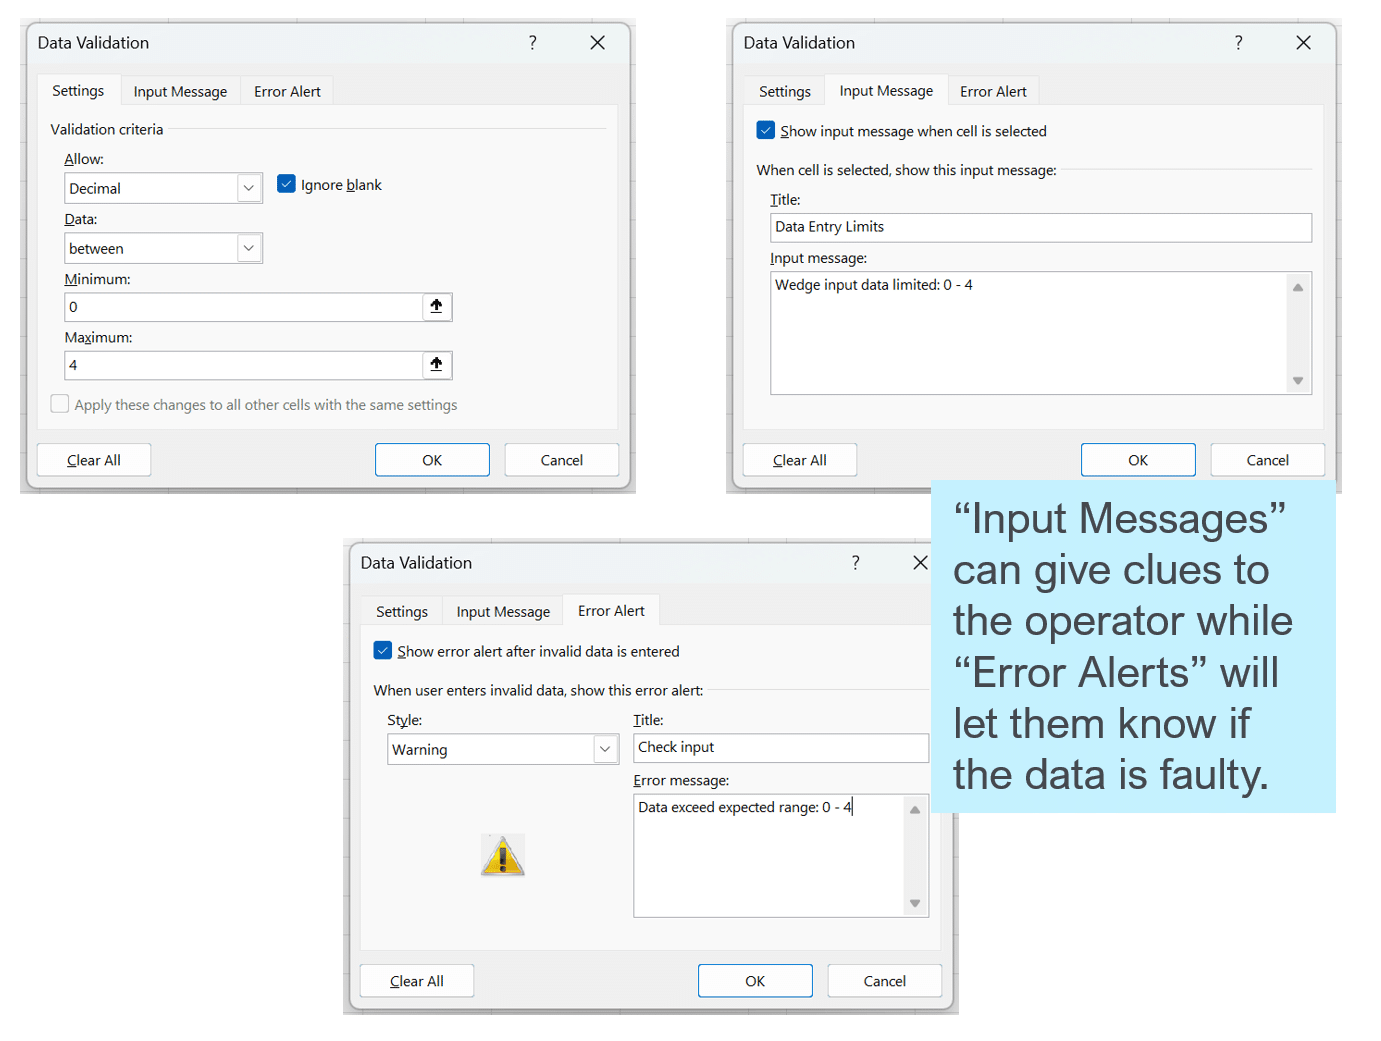
The resulting spreadsheet will give a data input message to communicate the expected ranges and warn the operator if a value falls outside of the expected limits. This function will operate in an unprotected or protected sheet.
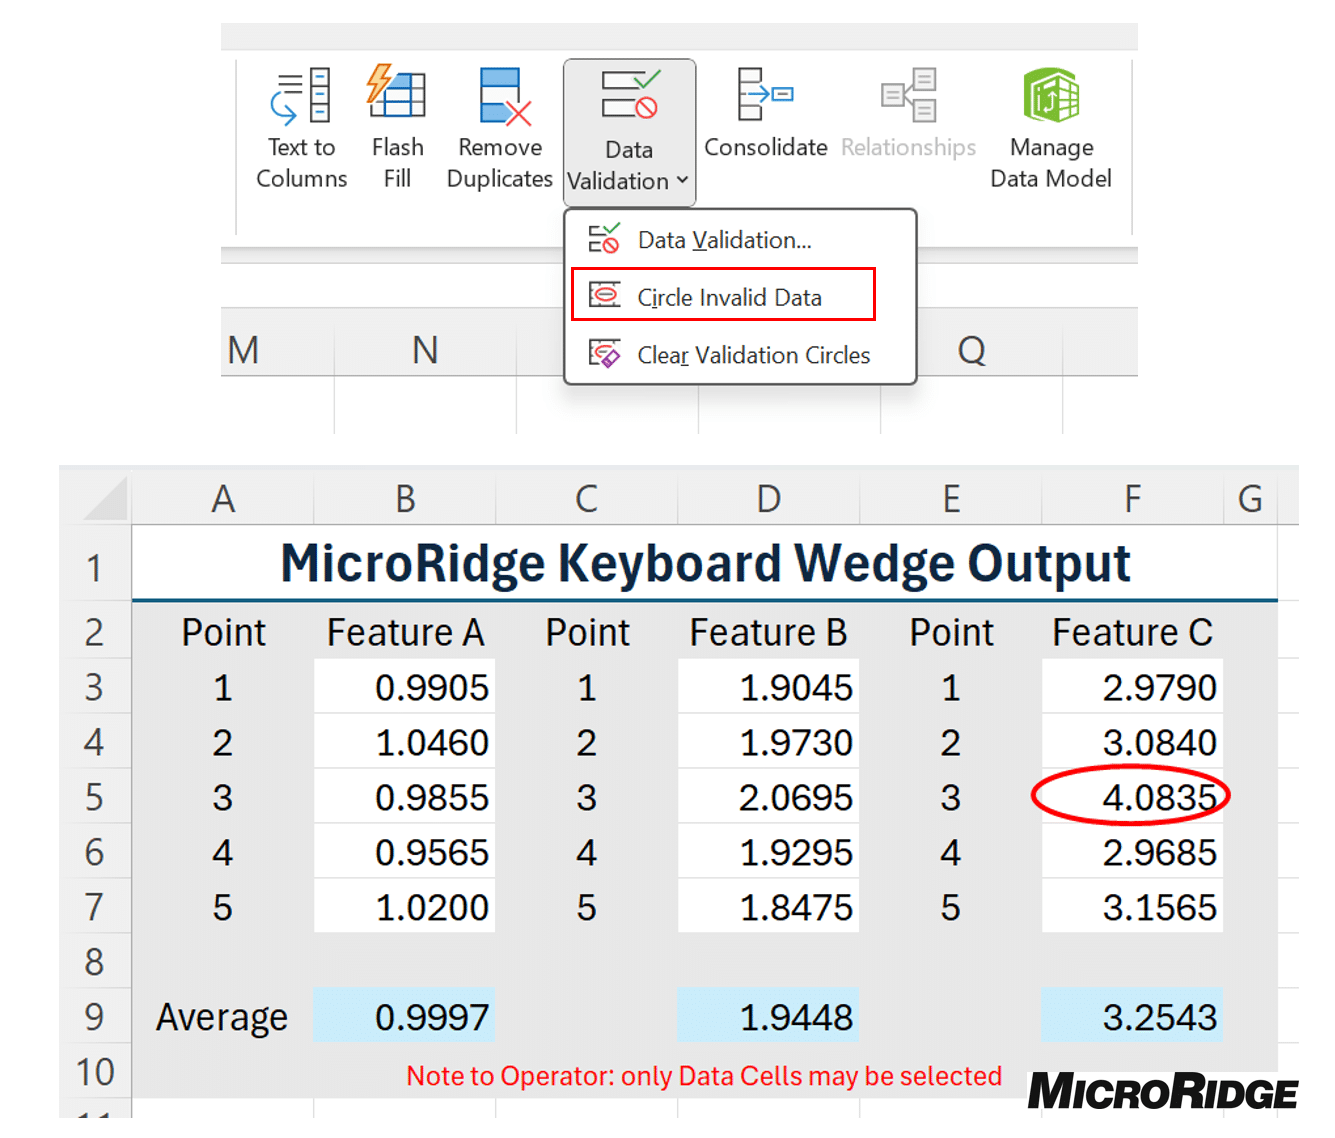
Since the operator was allowed to bypass the warning, there is still a chance that data is outside the expected range. The Document owner can audit the sheet for any data that falls outside the range buy utilizing the “Circle Invalid Data” tool. This tool checks all data cells with “Data Validation” and circles any data not conforming to the rules. This can only be done in an unprotected sheet.
3b: Conditional Formatting – Conditional Formatting
“Conditional Formatting” can be a useful way to give an operator a visual clue into the results of the data. By setting up “Conditional Formatting” you can identify when a data point is out of the expected range, this allows the operator to easily understand Go/No-Go classifications of a feature or part.
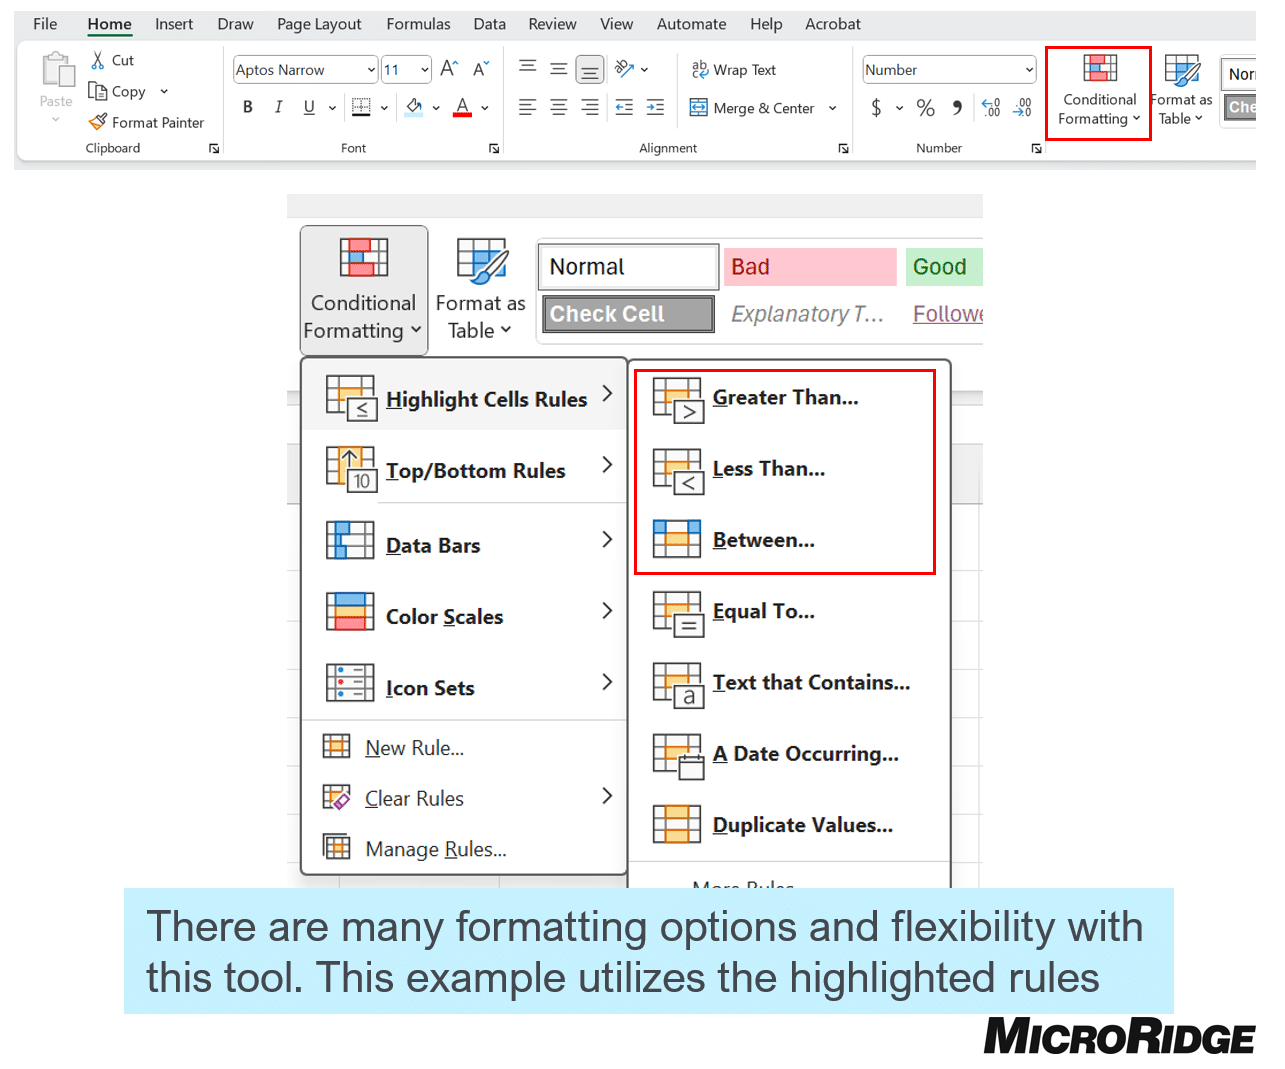
By setting up ranges and limits, “Conditional Formatting”, a document owner can give easy to understand live feedback to an operator.
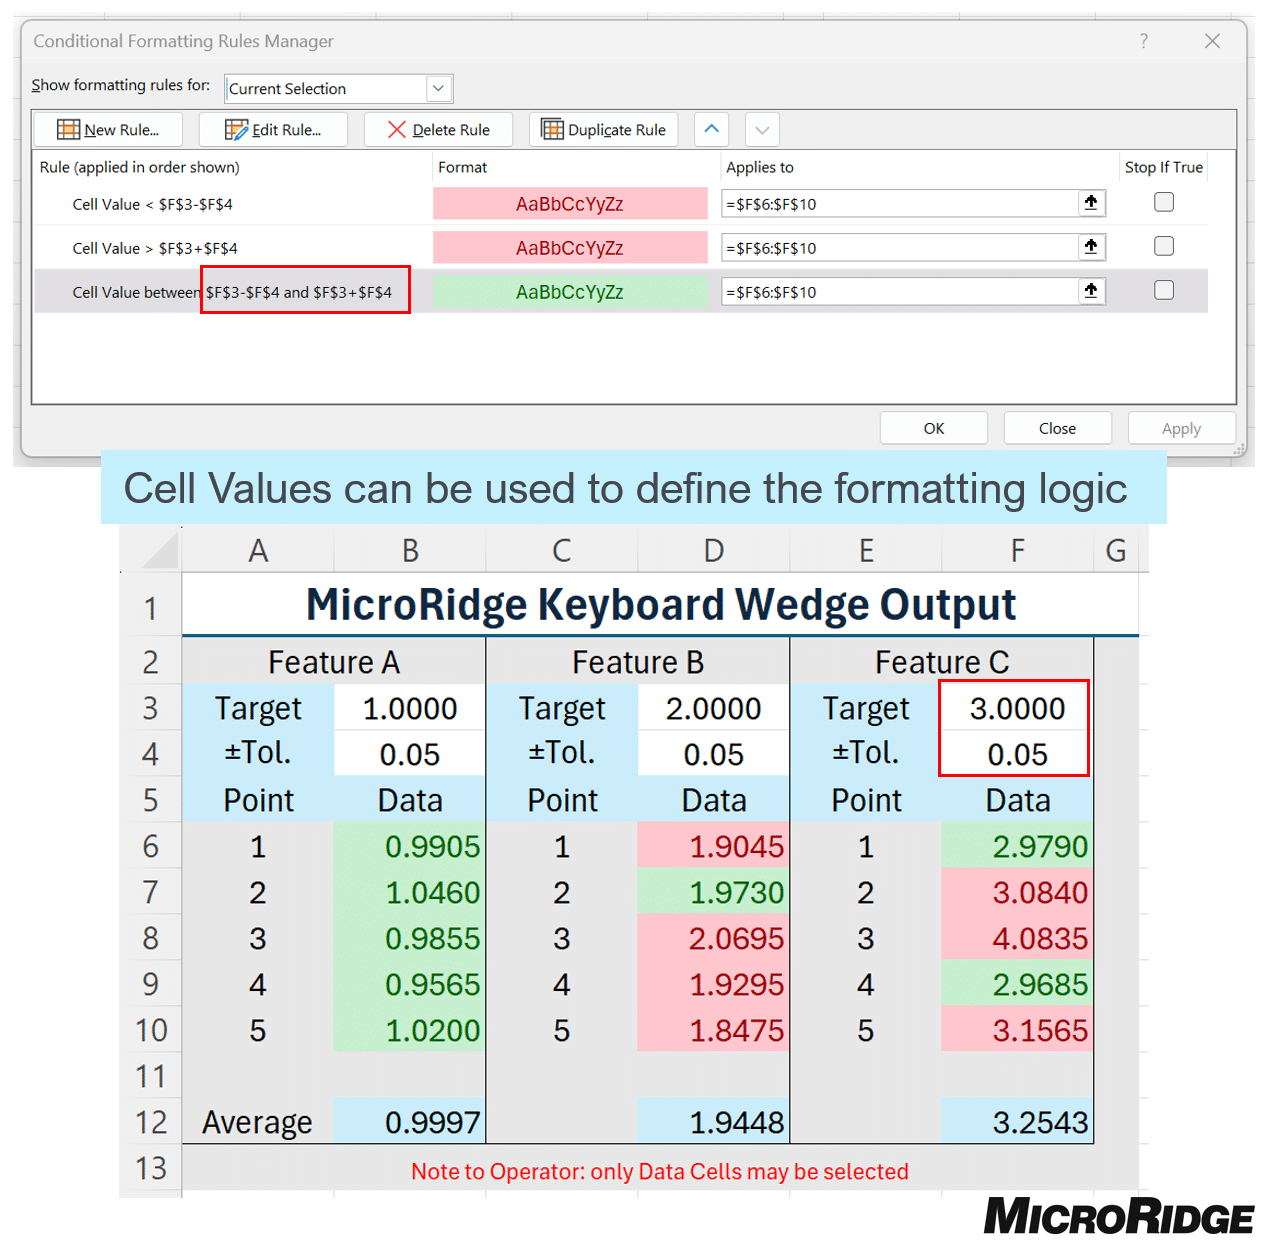
When combined with various formulas, “Conditional Formatting” can be used to show Go/No-Go for a part or feature if multiple measurements are taken. If you are interested in learning more about formulas, there are many great guides online.
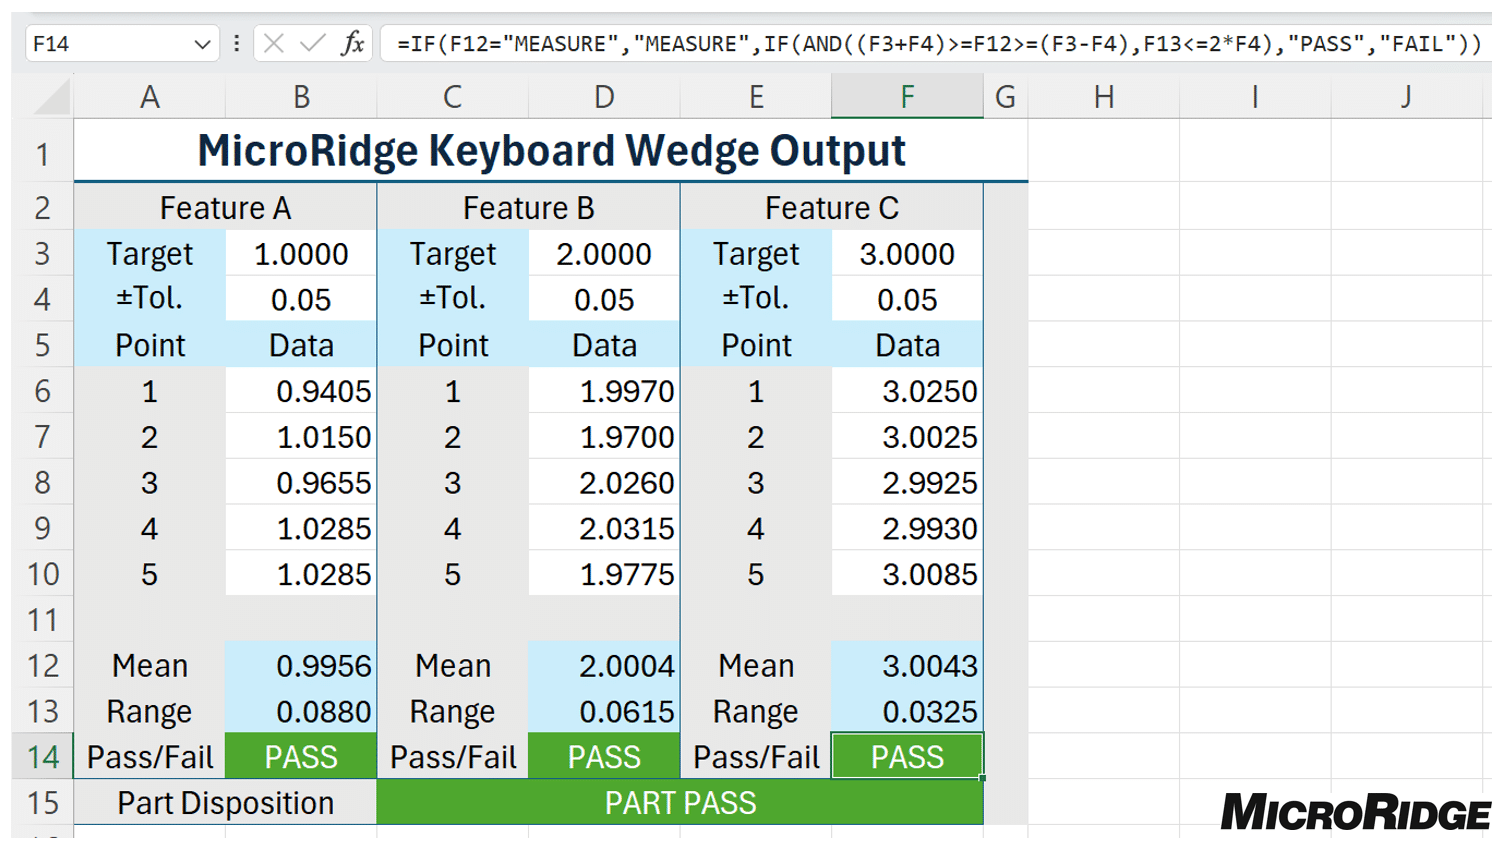
3c: Directing Data – Filter Formula
MobileCollect Wireless and GageWay Pro devices allow for multiple gages to be paired/connected. To help the document owner determine what gage the data is coming from, a label can be assigned to each transmitter/channel and sent to the Excel spreadsheet.
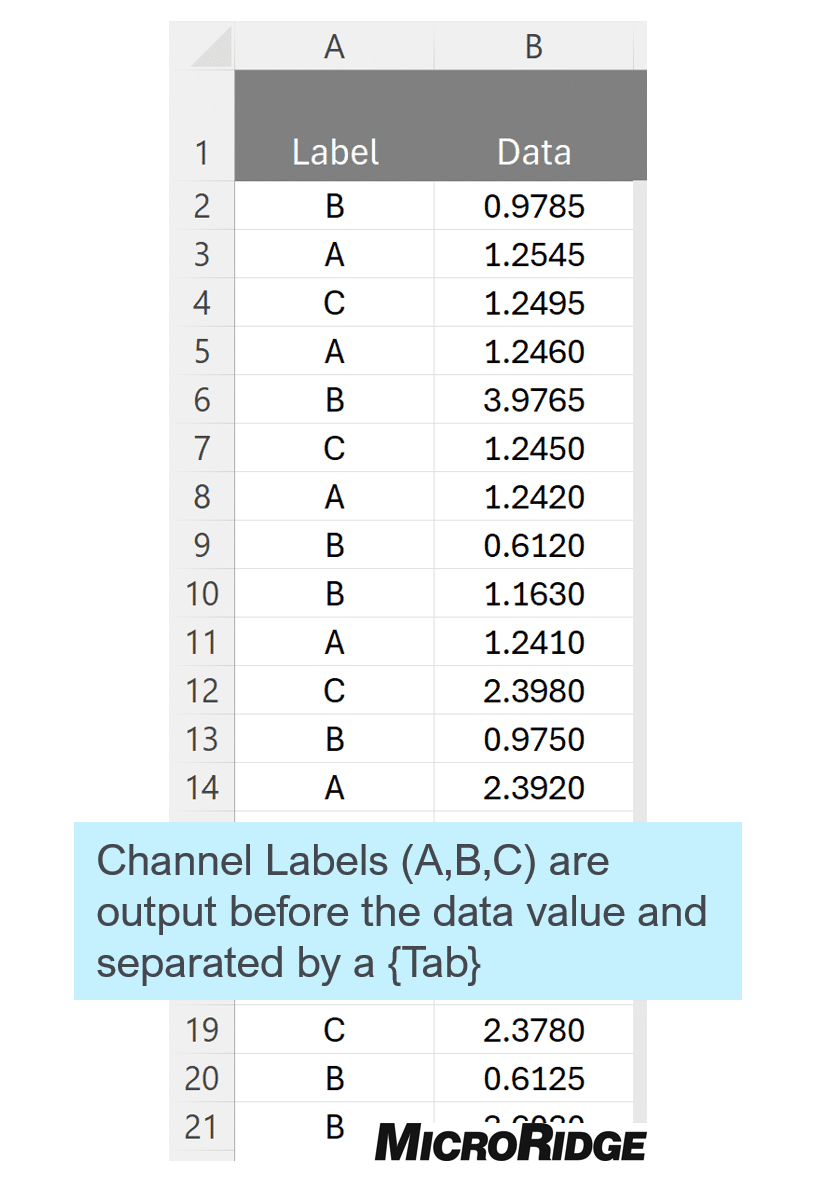
This data format is not easily understood by document owners and operators alike, by utilizing the “Filter” Formula a document owner can organize the data into corresponding labeled columns.
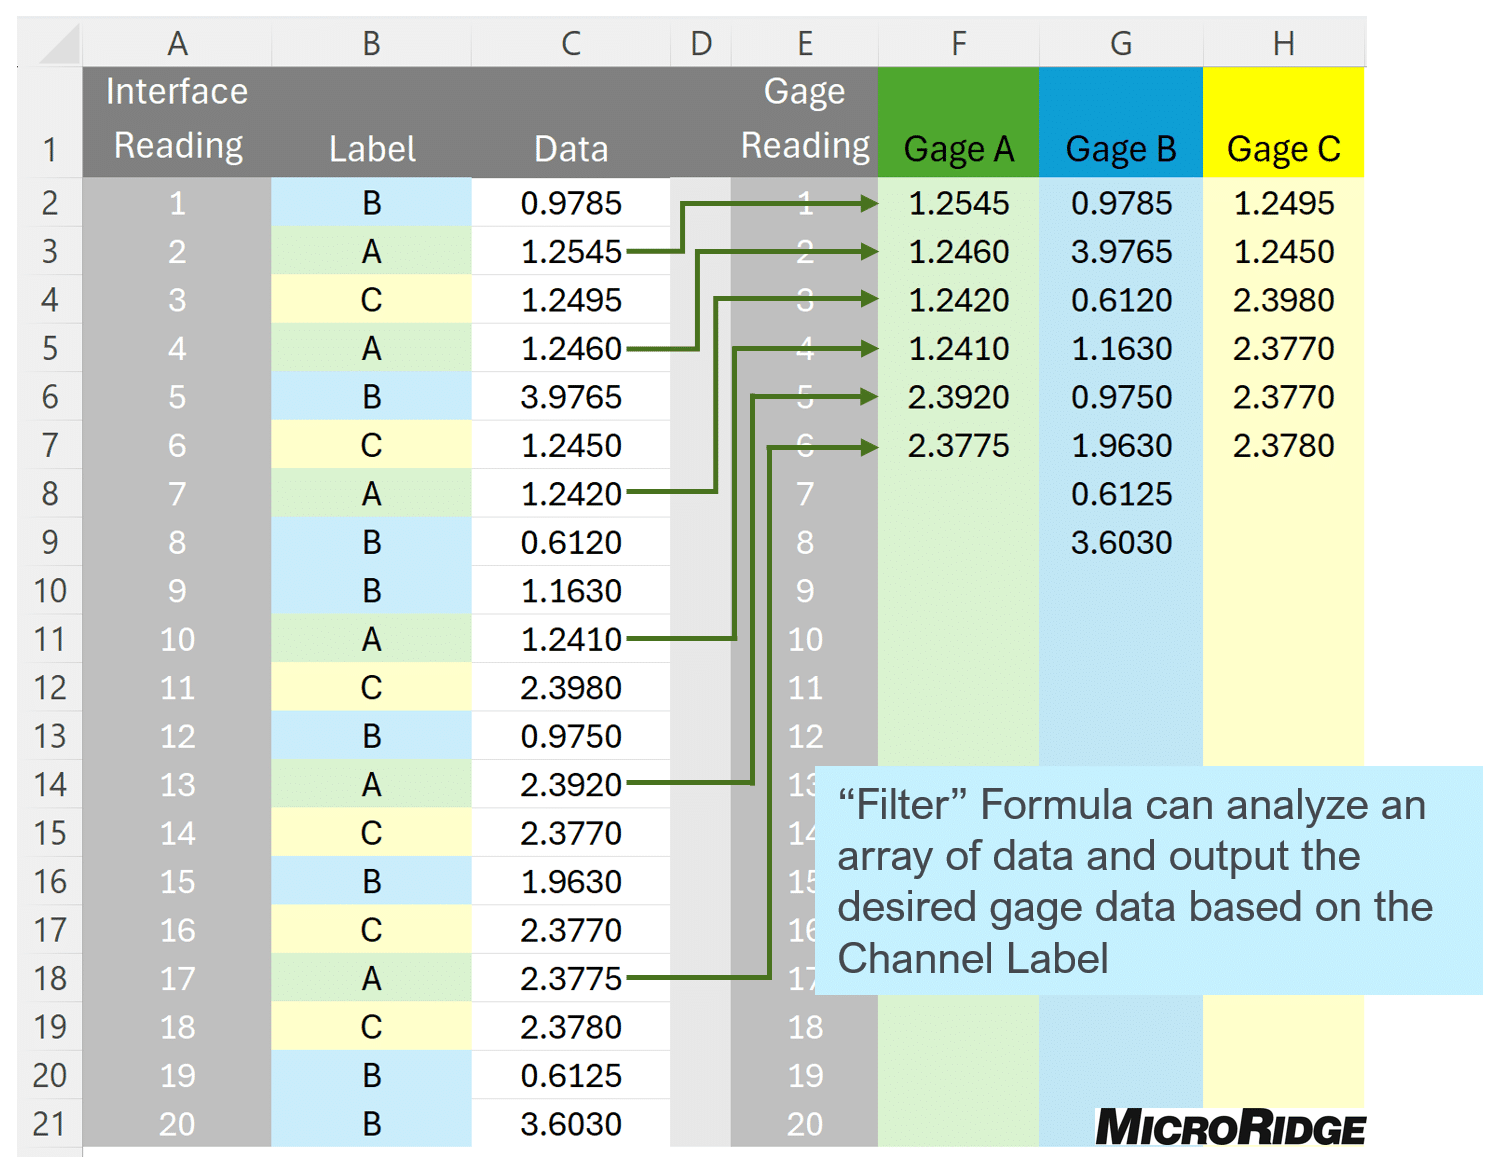
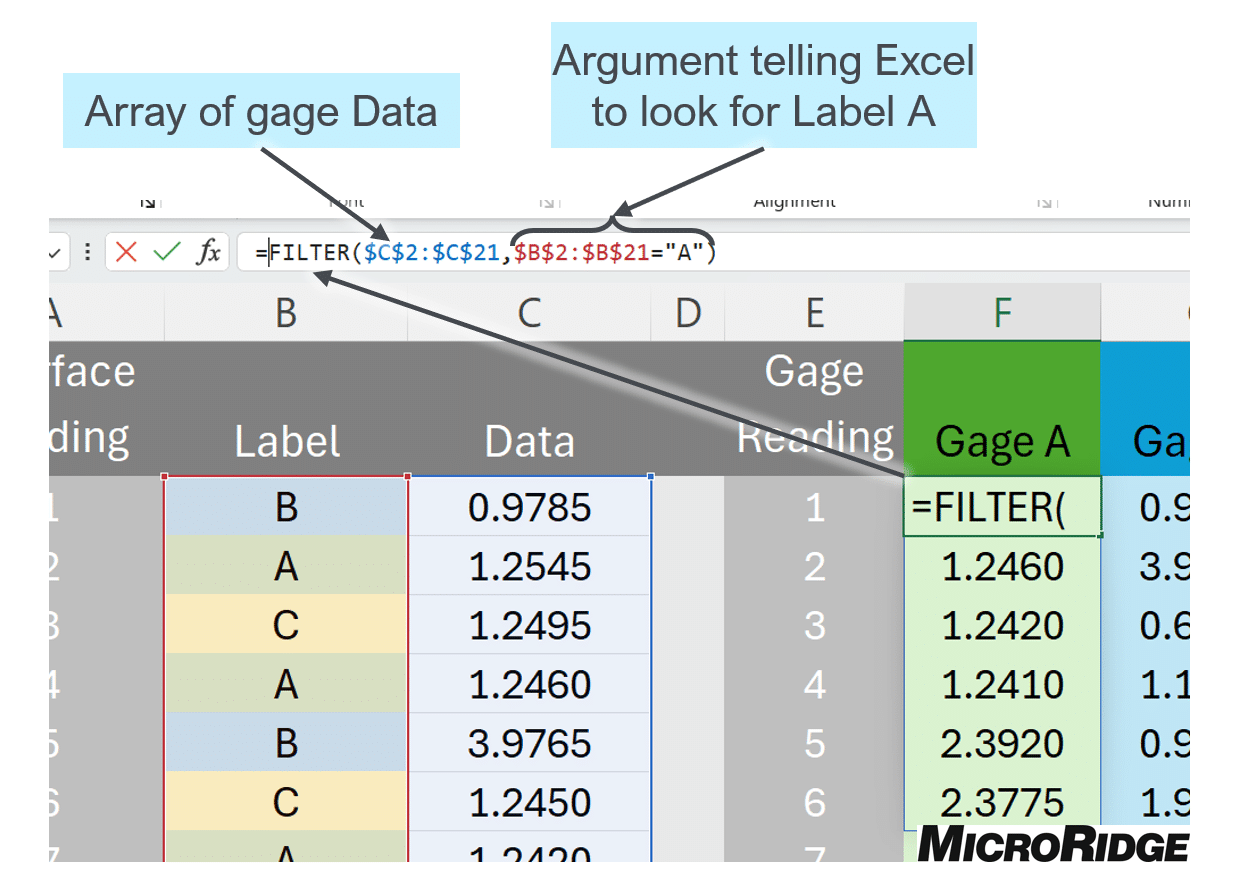
The Filter Formula searches an array of data that is entered in the first part of the formula and outputs the data values that match the argument entered into the second part of the formula.
There are many more customizations that can be implemented into Excel to customize a spreadsheet to meet your needs. These are some of the basic and frequently requested functions that MicroRidge has found helpful for our customers. This is not a comprehensive guide on programming your Excel spreadsheets, but it should give you an idea of how you can utilize existing Excel functions to make your Keyboard Wedge more useful and powerful as a part of our Quality Control/Assurance program!
Excel Template
This is a free Excel template that is based on the items discussed in this guide. Please feel free to use it and experiment with what is possible.
Want to Test Drive MicroRidge Keyboard Wedge?
Would you like to get hands on experience with MicroRidge devices to see how they work in your facility? Our Demo Kit program is perfect when you want to try before you buy.
How does it work?
Our Demo Kit program is very flexible and we can tailor the kit to your needs. The standard kit includes a Wedge/USB Base, a Mini Mobile Module and a 6″ Mitutoyo Caliper. The kit can also be configured for the devices you would like to bring online.


